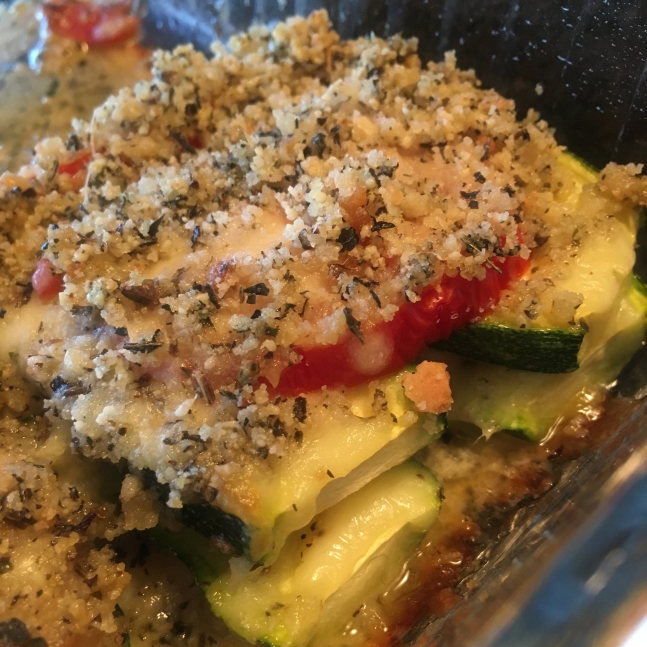
Zucchini, Tomato & Mozzarella Casserole

Zucchini, Tomato and Mozzarella Casserole

This is a super easy, comforting side dish, perfect for all those zucchini and tomatoes over-flowing your garden! I adapted the recipe from Melissa’s Southern Style Kitchen, she used halved zucchini with Gouda cheese, I sliced mine and used Mozzarella. There are endless ways you can make this dish but the spices in the recipe below really hit the spot with me! You could easily add your favorite cooked protein to the layers to create a complete meal, this particular recipe would be great with a spicy Italian sausage.

Zucchini, Tomato & Mozzarella Casserole

Serves 4 as a side dish

Ingredients
  • 2 medium zucchini, sliced length-wise (10-12 slices total)
  • 2 Roma tomatoes thinly sliced (18 slices total)
  • salt
  • 3 Tbsp ghee or butter, melted (olive or avocado oil would be good too)
  • ¼ tsp garlic salt
  • ¼ tsp onion powder
  • ¼ tsp dry Italian seasoning
  • ¼ tsp black pepper or to taste
  • 4 ounces shredded mozzarella cheese
  • ¼ cup gluten free panko breadcrumbs (I used Ian’s)
  • 2 Tbsp grated Parmesan cheese
  • 2 tsp dry basil
Instructions
  1. Pre-heat the oven to 350°F and spray an 8×8 glass dish with cooking spray or lightly grease with butter/oil.
  2. Place the tomato slices on a paper towel and sprinkle lightly with salt. Gently press another paper towel on top and allow to sit while you prepare the rest of the ingredients.
  3. Slice the zucchini lengthwise into ¼” slices to yield 5-6 per zucchini.
  4. Mix 2 Tbsp melted ghee/oil with the garlic salt, onion powder, dry Italian seasoning and black pepper.
  5. Place one layer of zucchini in the bottom of the casserole dish. Brush the tops of the zucchini lightly with the seasoned ghee/oil. Place a layer of tomatoes on top of the zucchini.
  6. Sprinkle with ½ of the mozzarella cheese.
  7. Repeat the layers of zucchini (brushed with seasoned ghee/oil), tomato and remaining mozzarella cheese.
  8. Toss the panko breadcrumbs, dry basil and grated Parmesan cheese with the remaining 1 Tbsp of ghee/oil and sprinkle over the mozzarella cheese, lightly pressing down.
  9. Bake for 30 minutes or until fork tender.
  10. Enjoy!

Stuffed Sweet Potatoes

Sweet potato stuffed with bacon, onion, mushrooms and spinach.

I LOVE sweet potatoes, I would probably eat them at every meal if I could.  I like them baked, fried or sautéed, diced, sliced or even pureed but I am really loving them stuffed!  The recipe and photo shown here is currently my favorite way to stuff them but the possibilities are endless (think any great pizza toppings and you’re set!), you can top them with anything you like and customize them to meet your dietary needs.

Ingredients

  • 2 medium sweet potatoes, about 8 to 10 oz each and scrubbed clean
  • 4 slices bacon
  • 4 ounces mushrooms, sliced
  • 4 cups baby spinach
  • 1/2 cup onion, chopped
  • 2 ounces cheese (I like to use raw Monterrey Jack)
  • 1/4 cup grated Parmesan
  • Sea salt and freshly ground pepper to taste

Directions

  1. Preheat the oven to 400° F. Pierce each sweet potato several times with a fork. Place them on a parchment lined baking sheet and bake on the middle oven rack.
  2. Bake until the sweet potatoes are easily pierced with a knife and cooked through, about 45-60 minutes depending on size. Remove from oven and let stand until cool enough to handle.
  3. While the sweet potatoes are baking, make the topping. Fry the bacon in a large skillet until crispy.  Remove from pan, cool and crumble.  Add the mushroom and onion to the pan with the bacon drippings and saute until tender, add spinach and cook until wilted.  Remove from heat.
  4. Slice sweet potatoes in half lengthwise to expose cooked insides, slightly press down the meat of the potato to flatten.  Divide the vegetable mixture evenly between the four halves, top with cheese and crumbled bacon and place under the broiler until melted.  Finally, sprinkle with Parmesan cheese.
  5. Serve half a stuffed potato as a side dish or a whole one with a mixed green salad as a meal.

This post is shared at:

5 Ingredient Mondays, Slightly Indulgent Tuesday, Fat Tuesday, Tasty Tuesday, Tempt My Tummy Tuesday, Gluten-Free Wednesday, Wednesday Extravaganza, Allergy-Free Wednesday, Wheat-Free Wednesday, Whole Food Wednesday, Fight Back Friday, Gluten-Free Fridays

Bacon, Egg and Blue Cheese Asparagus

IMG_3028

Bacon, Egg and Blue Cheese Asparagus 

2 pounds fresh asparagus, trimmed

3 hard-boiled eggs, chopped

6 slices bacon, cooked and crumbled

1/4 cup extra virgin olive oil

1/2 lemon, juiced

salt and pepper, to taste

2 ounces blue cheese, crumbled

  • Lay the asparagus spears in a large skillet and top with 1 inch of water. Lightly salt the water and bring to a simmer. Cook, covered, for 3 to 5 minutes or until crisp-tender.  Drain off the cooking water.
  • In a small bowl, whisk together olive oil, lemon juice, salt, pepper and blue cheese until well combined but still chunky, set aside.
  • Place asparagus on a serving platter, top with chopped eggs and bacon.
  • Drizzle the entire dish with the blue cheese dressing or serve on the side.
  • Enjoy!

This post is shared at:

Slightly Indulgent Tuesday, Fat Tuesday, Tasty Tuesday, Gluten-Free Wednesday, Wednesday Extravaganza, Allergy-Free Wednesday, Whole Food Wednesday, Fight Back Friday, Gluten-Free Friday

Crispy Sweet Potato Fries

I love sweet potato fries.  I don’t eat out much, well hardly at all really, and only at a handful of local restaurants.  One of my favorite places to eat used to be California Cafe in Denver because they had a lovely gluten-free menu, used local and seasonal ingredients and had the best fresh, hand cut sweet potato fries, ever.  It was a sad day for me when they closed!  I’ve tried many different methods of cooking, frying and baking sweet potatoes to recreate the light crispy texture of those wonderful fries at California Cafe but never could get it just right…until now.  Double frying is definitely the secret to getting a crispy fry that is still light and fluffy on the inside.  This is really a process but totally worth it.  If you don’t have the time or the patience for frying I also have perfected the oven-baking method too and I have included the instructions for that as well!

Ingredients

  • 2 1/2 pounds sweet potatoes
  • 1 Tbsp. arrowroot powder
  • coconut oil, for frying or baking
  • sea salt, for sprinkling
  • Ketchup and sour cream, for serving

Directions

Peel and rinse the sweet potatoes. Cut each potato lengthwise into 4 or 5 pieces, then cut each piece into sticks. The thinner these are, the crispier they will be. Place the fries in a large bowl. Cover with cold water, then allow them to soak 2 or 3 hours (or you can stick them in the fridge and let them soak overnight).

When you’re ready to make the fries, drain the water and lay the potatoes on 2 baking sheets lined with paper towels. Blot with paper towels to dry.  Place the patted dry sweet potatoes into a dry bowl and sprinkle with the arrowroot powder and toss the potatoes to coat evenly.

For Frying:

Heat a few inches of coconut oil to 300° F in a heavy pot. In 3 or 4 batches, fry the potatoes about 4 to 5 minutes per batch, or until soft. They should not be brown at all at this point-you just want to start the cooking process. Remove each batch and drain them on new, dry paper towels or a brown paper bag.

Once all the potatoes have been fried at 300 degrees F, turn up the heat until the oil temperature reaches 400 degrees F. When the oil is hot, start frying the potatoes in batches again, cooking until golden and crisp. Remove from the oil and drain on fresh paper towels or a fresh brown paper bag. Sprinkle the fries with sea salt and serve with the ketchup and sour cream for dipping.

Baked Sweet Potato Fries

For Baking:

Preheat the oven to 425° F. Line a baking sheet with parchment paper.  Place the patted dry sweet potatoes into a dry bowl and sprinkle with the arrowroot powder and toss the potatoes to coat evenly.  Once the potatoes are coated with the arrowroot, drizzle with 2 Tbsp. of melted coconut oil again tossing to coat evenly, sprinkle with sea salt.  Spread the sweet potatoes onto the prepared baking sheet in a single layer making sure not to overcrowd, use two baking sheets if necessary.  Bake for 45-50 minutes, turning occasionally, until the sweet potatoes are crispy and browned.  Let cool on the pan for a few minutes before serving.

This recipe is shared at:

Made From Scratch Monday, Slightly Indulgent Tuesday, Fat Tuesday, Tempt My Tummy Tuesday, Tasty Tuesday, Gluten-Free Wednesday, Whole Food Wednesday, Allergy-Free Wednesday, Fight Back Friday, Gluten-Free Fridays, Foodie Friends Friday

Crispy Delicata Squash Fries

Crispy Delicata Squash Fries…so tasty.

Winter squash seem to be EVERYWHERE these days and I couldn’t be happier!  This is a super easy and quick recipe that makes a comforting side dish for any meal…I love to roast pretty much any squash but I especially like the Delicata since the skin is edible, no peeling necessary!!!

Delicata Squash Fries

2 Delicata Squash

2 Tbsp. coconut oil

salt and pepper, to taste

Preheat oven to 425 degrees F.  Line a large rimmed baking sheet with parchment paper.  With a sharp knife cut squash in half and remove the seeds.  Slice the squash into 1/4″ pieces.

Seeded and sliced delicata squash

Place squash in a large mixing bowl and toss with coconut oil and salt and pepper to coat.

Place coated squash on the parchment lined baking sheet.

Bake for 30 minutes, turning all the squash halfway through baking.  Once the squash is browned and crispy, remove from oven and sprinkle with sea salt.  Serve immediately.

Hot out of the oven.

This recipe is shared at:

Tempt My Tummy Tuesdays, Slightly Indulgent Tuesday, Tasty Tuesday, Fat Tuesday, Whole Foods Wednesday, Fill Those Jars Fridays, Allergy Free Wednesday, Fight Back Friday, Gluten-Free MondayGluten-Free Wednesdays , Gluten Free Fridays

Bacon Wrapped Sweet Potato Bites…Oh, Yes I Did!

Bacon Wrapped Sweet Potatoes…Could there be anything better?

Bacon.

That is all.

Really, does anything more need to be said?  Seems like everything just tastes better wrapped in bacon…dates, jalapenos, asparagus, scallops, filet Mignon…I’ve tried them all, why not sweet potatoes?  This lovely little bit of heaven did not disappoint!  Great as an appetizer, side dish or even a light meal with a salad!

Bacon Wrapped Sweet Potatoes

1 Large sweet potato, peeled

4-6 slices sugar-free bacon

olive oil

chili powder

toothpicks

Preheat oven to 400 degrees F.  Line a rimmed baking pan with foil or parchment paper.  Cut the sweet potato into 1″ chunks.  Slice the bacon in half crosswise and then lengthwise to yield 16-24 strips, use enough bacon to have one strip per sweet potato chunk.  Wrap each sweet potato chunk with a strip of bacon and secure with a tooth pick, place on baking pan.

Drizzle with olive oil and sprinkle with chili powder.

Bake for 20 minutes, remove from the oven and flip over.

Place back in the oven for an additional 20-25 minutes, until the bacon is crispy and sweet potatoes are browned.

Remove to paper towel lined plate until ready for serving.  These are best served warm with sour cream (if you eat dairy), homemade ranch or guacamole for dipping.

This recipe is shared at:

Gluten-Free Wednesdays, Whole Foods Wednesdays, Beyond the Peel, Slightly Indulgent Tuesdays, Fat Tuesday, Tasty Tuesday, Bizzy Bakes, Tastetastic Thursday, Fight Back Friday, Fresh Bites Friday

Spicy Turnip Fries & Fresh Pickle Relish

Spicy Turnip Fries

Turnips are root vegetables that are similar in texture to a white potato so they are a great substitution in most recipes calling for a starchy white potato.  A white-fleshed turnip has a white skin with a purple-tinged top.  A rutabaga, which is sometimes called a yellow-turnip is actually a relative of the turnip with similar taste and texture to the white fleshed ones.  Small, young turnips have a delicate, slightly sweet taste.  Fresh turnips are available year-round, with the peak season from October through March.

This recipe is an oldie but goodie…it’s a great accompaniment to any roasted or grilled meat, especially burgers or Italian sausage (pictured above).  I love the spiciness of chili powder but you could use any spice you like or even just salt and pepper.

Spicy Turnip Fries (serves 2)

2 turnips (about 1 pound), peeled

2 tablespoons coconut oil, melted

1 teaspoon chili powder

1/2 teaspoon sea salt

  • Preheat oven to 400 degrees F and line a baking sheet with aluminum foil.
  • Slice the peeled turnips into strips (like french fries).
  • Toss sliced turnips with coconut oil, chili powder and salt.
  • Place turnips on the prepared baking sheet in a single layer.
  • Bake for 30-40 minutes, turning once halfway through baking, until evenly browned.
  • Serve hot from the oven.

Fresh Pickle Relish

This recipe is a fresh and healthy alternative to store-bought pickle relish which is usually loaded with sugar and preservatives.  You can adapt it to be a dill pickle relish or add a touch of stevia for a sweet pickle relish…both are super tasty!

Fresh Pickle Relish (serves 2, generously)

1/2 cup finely chopped bell pepper (red, green or yellow or combination)

1 medium tomato, finely chopped

1/4 cup finely chopped red onion

1/4 cup finely chopped dill pickle (I use Bubbies)

1 Tablespoon Apple Cider Vinegar

1/8 – 1/4 teaspoon sea salt

10 drops liquid stevia (optional for a sweet pickle relish)

In a small bowl, combine chopped pepper, tomato, onion, pickle, vinegar and salt and mix well.  Set aside for at least 20 minutes to let flavors combine.  Enjoy on grilled brats and burgers!

This recipe is shared at:

Wellness Weekend , Fight Back Friday, Fat Tuesday, Slightly Indulgent Tuesday

Herb-Marinated Pork Tenderloin and Oven-Roasted Green Beans

Herb Marinated Pork Tenderloin & Oven-Roasted Green Beans

I rarely eat out…which means I cook A LOT!  Don’t get me wrong, I love it but sometimes I just don’t have the energy to create a new recipe so I head to the internet for inspiration…these recipes are inspired by two great chefs from the Food Network, Ina Garten and Emeril Lagasse.  Both original recipes can be viewed at http://www.foodnetwork.com by clicking on the recipe title, I only tweaked the measurements slightly and of course added some bacon!  This was essentially a one pan and one baking sheet meal, easy prep and quick clean-up!

Herb-Marinated Roasted Pork Tenderloin

Ingredients

  • 1/2 lemon, zest grated
  • 1/4 cup freshly squeezed lemon juice (4 to 6 lemons)
  • 3 tablespoons extra virgin olive oil
  • 2 teaspoons minced garlic (2 cloves)
  • 2 teaspoons minced fresh rosemary leaves
  • 1 teaspoon chopped fresh thyme leaves
  • 1/2 teaspoon Dijon mustard
  • 1 teaspoon Kosher salt
  • 1 pork tenderloin (about 1 pound)
  • Freshly ground black pepper
  • 1 tablespoon coconut oil, ghee, butter or lard

Directions

Combine the lemon zest, lemon juice, olive oil, garlic, rosemary, thyme, mustard, and salt in a sturdy 1-gallon resealable plastic bag. Add the pork tenderloin and turn to coat with the marinade. Squeeze out the air and seal the bag. Marinate the pork in the refrigerator for at least 3 hours but preferably overnight.

Preheat the oven to 400 degrees F.

Remove the tenderloin from the marinade and discard the marinade but leave the herbs that cling to the meat. Sprinkle the tenderloin generously with salt and pepper. Heat 1 tablespoons coconut oil (or your fat of choice) in a large oven-proof saute pan over medium-high heat. Sear the pork tenderloin on all sides until golden brown. Place the saute pan in the oven and roast the tenderloin for 10 to 15 minutes or until the meat registers 137 degrees F at the thickest part. Transfer the tenderloin to a platter and cover tightly with aluminum foil. Allow to rest for 10 minutes. Carve in 1/2-inch-thick diagonal slices. The thickest part of the tenderloin will be quite pink (it’s just fine!) and the thinnest part will be well done. Season with salt and pepper and serve warm, or at room temperature with the juices that collect in the platter.

Oven-Roasted Green Beans with Shallots and Bacon

Ingredients

  • 1 pound green beans, rinsed and ends trimmed
  • 3 slices sugar/nitrate-free bacon
  • 1 shallot, chopped
  • 2 teaspoons minced garlic
  • Celtic sea salt
  • Freshly ground black pepper

Directions

Preheat the oven to 400 degrees F.

Line a large baking pan with foil or parchment paper.  In a large skillet over medium-high heat fry bacon until crisp, remove to paper towels to drain, once cool crumble and set aside.  Reserve bacon grease by straining into a bowl and set aside to cool.  In a large bowl combine green beans, shallots, garlic and 2 tablespoons of the reserved bacon grease.  Add salt and pepper and toss, making sure all the vegetables are coated evenly with the bacon grease and spices.  Spread onto the prepared baking sheet.  Roast in the oven for 18 – 22 minutes, stirring halfway through baking.  The green beans will be slightly caramelized and wrinkly when done, some will be crispy.  Serve warm and topped with the reserved crumbled bacon.

This recipe is shared at:

Fight Back Friday, Fresh Bites Friday, Friday Food Flicks, Make Ahead Monday, Fat Tuesday, Slightly Indulgent Tuesday,

Tasty Tuesday, Gluten-Free Wednesday, Whole Food Wednesday

Bacon Wrapped Asparagus

Easy, Elegant and Healthy.

Asparagus.  Bacon.  Need I say more?

Bacon Wrapped Asparagus:

1 1/2 pounds asparagus (24-32 stalks), ends trimmed

4 slices organic uncured bacon, prosciutto or pancetta

olive oil

salt and pepper

Preheat oven to 400 degrees F.  Trim stalky ends off the asparagus, wash and pat dry.  Lightly coat asparagus in olive oil and season with salt and pepper.  Wrap 6 – 8 stalks of asparagus with one slice of bacon and place bundle on a broiler or sheet pan, repeat with remaining asparagus and bacon.  Bake for 12-14 minutes, turning bundles once halfway through.  Bacon should be crisp and asparagus tender.

***Asparagus can also be cooked on a hot grill…place bundles directly on grill and cover, cook 10-12 minutes.

***If your asparagus bundles won’t hold together secure bacon with a toothpick or kitchen twine.

I used an oven proof pan this time...worked beautifully.

This recipe is shared at:

Slightly Indulgent Tuesday, Tasty Tuesday & Fat Tuesday

Gluten Free Wednesdays

Fight Back Friday