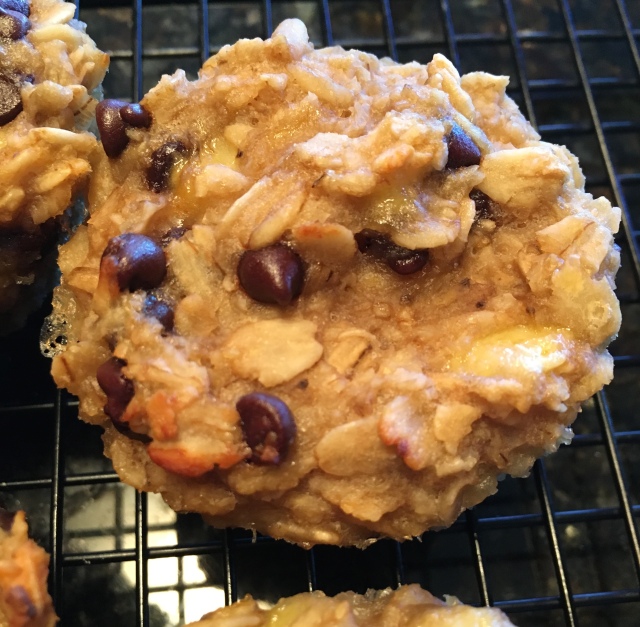
Gluten-Free Oatmeal Chocolate Chip Muffins

IMG_1897

Perfect for a healthy breakfast on the run…

Who doesn’t love a healthy grab-n-go breakfast?
This is a super easy make ahead recipe that is perfect for those mornings when you are racing out the door but don’t want to skip a healthy breakfast. One or two of these muffins heated in the microwave and you’ve got a tummy-warming oatmeal breakfast without the mess! Feel free to customize these to your liking, sub out the chocolate chips for raisins or dried cranberries, add a dash of cinnamon or use pumpkin in place of the banana…the options are endless.

Oatmeal Chocolate Chip Muffins

Ingredients (for 24 muffins):

5 cups gluten-free rolled oats (I used Bob’s Red Mill)

1 tsp. salt

2/3 cup mini chocolate chips

2 1/2 cups mashed ripe bananas

5 Tbsp. honey or maple syrup

2 1/3 cup water

5 Tbsp. coconut oil, melted

2 1/2 tsp. vanilla extract

Instructions:

Preheat oven to 375º F. Line 24 muffin cups with silicone liners.

In a large mixing bowl, combine oats, salt and mini chocolate chips. In a separate bowl whisk together mashed banana, sweetener, water, oil and vanilla. Mix wet ingredients into dry ingredients, combine thoroughly. Divide evenly into muffin cups. These don’t rise so a heaping 1/4 cup of batter is enough to fill the muffin cup without running over.

Bake for 20 minutes, rotating pans 180º after 10 minutes. Remove from oven and cool on wire racks. Freeze in airtight container or plastic freezer bags.
IMG_1899

Glazed Lemon Muffins

IMG_1481

I’m not sure what my problem is with lemon but…I just don’t like the sound of it in my food.  I’m not saying that I don’t like the taste of it once it’s there but recipes like Lemon Bars, Lemon Pie, Lemon Dill Salmon, Lemon Chicken NEVER appeal to me…meaning I would never tear a recipe out of a magazine or order off a menu anything with lemon (or lime, for that matter!) in the title.  Weird, I know.  Especially since I enjoy the taste of pretty much each and every recipe I’ve encountered with those very ingredients!   I rarely make anything lemon or lime either.

According to my mother my dad LOVES lemon desserts, however, he is also a chocoholic (like me) so it never really occurred to me that he would actually want a lemon dessert over chocolate.  So, in honor of Father’s Day I prepared these delicious looking and smelling Glazed Lemon Muffins.  We will see if he is pleasantly surprised with lemon but I will surely have something chocolate prepared as back up!  My mom says they just might be her favorite dessert I’ve prepared…Humm…maybe, just maybe, she is the one who loves lemon desserts because she sure doesn’t like the chocolate ones… 😉

  This recipe is adapted from Kelly’s recipe for Lemon Bread at Primally Inspired.

Glazed Lemon Muffins

Muffins:

3 eggs

2 Tbsp. coconut oil or butter, melted

zest and juice from one lemon (about 1/4 cup)

1/4 cup almond milk

3 Tbsp. maple syrup or honey

1/3 cup coconut flour, sifted

1/2 tsp. baking soda

1/8 tsp. Celtic sea salt

Glaze:

1 Tbsp. coconut oil or butter

1 Tbsp. maple syrup or honey

1 Tbsp. almond milk

zest and juice from 1/2 a lemon (about 2 Tbsp.)

1/4 tsp. vanilla

Directions:

Preheat oven to 350° F.  Line a muffin tin with 6 silicone muffin cups or grease the tin very well with coconut oil.

In a small saucepan combine the ingredients for the glaze, bring to a simmer over medium-low heat.  Simmer for 5 minutes, stirring constantly then remove from heat and allow to cool for 45-60 minutes.

In a large bowl whisk together the eggs, coconut oil, almond milk and maple syrup.  Stir in the coconut flour, baking soda and sea salt. Mix until well combined.  Divide equally between the muffin liners, about 1/4 cup each.  Bake for 20-22 minutes or until the tops are slightly golden and a toothpick inserted in the middle comes out clean.  Allow the muffins to cool in the tin on a wire rack for about 30 minutes.

Remove the muffins from the silicon cups or muffin tin and set on the wire rack, place a piece of parchment paper under the wire rack to catch the glaze drizzle.  Drizzle the glaze over the muffins as desired and then place in the refrigerator to set the glaze for about 30 minutes.

Makes 6 muffins.

IMG_1475

This post is shared at:

5 Ingredient Monday, Slightly Indulgent Tuesday, Fat Tuesday, Tasty Tuesday, Gluten-Free Wednesday, Allergy Friendly Lunchbox Love, Wednesday Extravaganza, Allergy-Free Wednesday, Whole Food Wednesday, Gluten-Free Fridays, All Gluten Free Desserts

Coffee Almond Stracciatella (Dairy-Free)

Dairy free coffee ice cream loaded with toasted almonds and Italian style chocolate chips

I know it’s the middle of winter but I’m one of those crazy people who thinks Ice Cream is a food group and should be enjoyed regularly in any season!  My fondest memories of traveling to Paris to visit my son in college are the ridiculous amount of trips we made all over town seeking out the best gelato…I tried the Stracciatella, Amorena and Pistache at each shop we visited, those are my three favorites.  This is my best attempt thus far at recreating Stracciatella.  You can easily add the Stracciatella to any flavor of ice cream you choose to make, it also goes beautifully in a cherry almond ice cream!

Coffee Almond Stracciatella

Ice cream base:

2 cans full fat coconut milk

1/2 cup coconut palm sugar (or equivalent sweetener of choice)

2 Tbsp. instant coffee (I used 2 packets of Starbucks Via)

4 egg yolks

1/4 tsp liquid stevia

2 Tbsp. dark rum (optional)

Mix-Ins:

3/4 cup sliced almonds, lightly toasted

4 ounces dark chocolate, coarsely chopped and melted

Heat the coconut milk, sugar and instant coffee in a medium saucepan over medium heat.  Stir until the sugar and coffee are dissolved and the mixture reaches 170 degrees.  In a separate bowl whisk together egg yolks, stevia and rum until smooth.  Temper the egg yolks by slowly adding 1 cup of the hot coconut milk mixture to the bowl while whisking continuously.  Slowly add the tempered yolks back into the remaining coconut milk mixture, stirring or whisking constantly.  Continue to heat the coconut milk mixture until it reaches 180 degrees, it will be steaming but not quite boiling.  Pour the mixture though a mesh strainer into a bowl set over ice water and cool for 10-15 minutes, stirring occasionally.  Remove from ice bath, cover and chill in the refrigerator for at least 3 hours.  Pour chilled mixture into ice cream maker and churn according to manufacturers directions.

During the last few minutes of churning add the sliced almonds and then the dark chocolate (stracciatella).

Stracciatella – melt dark chocolate over low heat or in the microwave until smooth.  Drizzle a very thin stream of the warm chocolate into the ice cream during the last few minutes of churning.  If the chocolate is clinging too much to the dasher you can drizzle the chocolate over the ice cream as you layer it into the storage container, stirring it slightly while you are pouring.

When the ice cream is finished churning and mix-ins have been added transfer to a chilled air tight container and place in the freezer until firm (about 2 hours), recipe makes about 1 quart.

Scooped right from the freezer…

The BEST Monster Cookie You Will EVER Eat!!!

Everyone knows who Cookie Monster is but what about a Monster Cookie?  Well, let me just tell ya…it’s the best cookie you will ever eat.  It’s chewy, chocolatey, peanut buttery bliss…all wrapped up in a big giant cookie!  Paula Deen has a recipe for a Monster Cookie that is full of store-bought candies, brown and white sugars, oats, eggs and of course tons of BUTTER and The Pioneer Woman’s recipe has white flour, rice crispy cereal AND two and a half sticks of butter for 18 cookies!  I stopped eating that kind of cookie years ago…but I came across a Monster Cookie at Whole Foods Market that I thought might be a better alternative…Ha, I was lucky enough to be able to get a peek at the recipe and decided DEFINITELY not a better option.  I actually calculated out the approximate calorie count for the cookie and it was well over 500 calories…per cookie!  Better ingredients don’t always make a healthier choice.  I have tried and tried to replicate the recipe using different ingredient options here and there and could never quite get it right…until today.  Now, let’s be clear…cookies are a treat and no matter what kind they are and how “healthy” the ingredients may be they still should be enjoyed on special occasions (yeah, yeah, yeah…I know, whatever!).  Anyway, cookies are my treat of choice so this recipe is a complete and total victory for me!

Bliss.

Monster Cookies

Ingredients

1/2 cup quinoa flour

2/3 cup quinoa flakes

1/2 tsp. baking soda

1/2 tsp. baking powder

1/2 tsp. cinnamon

1/4 tsp. celtic sea salt (omit if your peanut butter is salted)

1/4 cup butter, melted (or coconut oil for vegan option)

1/4 cup peanut butter (or roasted almond butter)

6 Tbsp. coconut palm sugar

1 Tbsp. maple syrup

1/2 tsp. vanilla

2 Tbsp. water, if needed

1/4 cup walnuts, chopped

1/4 cup dark chocolate chips

Directions

Position a rack in the center of the oven and preheat to 350°F. Line a large baking sheet with parchment paper.

In a medium bowl combine the quinoa flour, quinoa flakes, cinnamon, baking soda, baking powder and salt.   Stir to blend well. In a large bowl combine the sugar, peanut butter, melted butter (or oil), syrup and vanilla; whisk to blend. Using a flexible rubber spatula, gradually stir the dry ingredients into the peanut butter mixture, if the mixture is too dry and not holding together add the water by tablespoon until it’s combined. Stir in the walnuts and chocolate chips.

For each cookie, drop 2 generous tablespoons of batter onto the prepared sheet, spacing the mounds about 2 inches apart. (Or use an ice cream scoop.) Using moistened fingertips, flatten each to a 3-inch-diameter round.

Bake the cookies until brown and a bit firm to the touch, 17 to 20 minutes. Using a metal spatula, transfer the cookies to a rack and cool completely.

Makes 8 GIANT Cookies!

Cookies and Ice Cream…Does dessert get any better than a Cookie Sundae? I think not.

This recipe is shared at:

Slightly Indulgent Tuesday, Fat Tuesday, Tempt My Tummy Tuesday, Gluten-Free Wednesday, Allergy-Free Wednesday, Whole Foods Wednesday, Gluten-Free Friday, Fight Back Friday, Fill Those Jars Friday, Made From Scratch Monday

Roasted Butternut Squash and Spinach Lasagna

Who needs dairy when you can have this?

It’s fall and time for comfort food…what better way to indulge than with a Butternut Squash and Spinach Lasagna.  I struggle with calling this dish “lasagna” since that dish traditionally defined as a baked dish containing layers of boiled lasagna noodles, and usually cheese, a seasoned sauce of tomatoes, and meat or vegetables…Well, we have a seasoned sauce of tomatoes and loads of meat and vegetables so I guess we are half-way there!  This recipe is pretty simple to throw together and can certainly be modified to include dairy by adding layers of ricotta and mozzarella (I’ve made it this way too and it is certainly delicious!).  Adapted from this recipe on Health-Bent.

Ingredients

  • 1 lb ground meat (beef, pork, turkey, or bison)
  • 2 Tbsp. Italian seasoning
  • 1/2 red onion, chopped
  • 3 cloves garlic, minced
  • 1/2 c red pepper, chopped
  • 4 oz mushrooms, chopped
  • 1 Tbsp. extra virgin olive oil
  • 1 24 oz jar tomato sauce
  • couple leaves of fresh basil
  • 5 ounces baby spinach
  • 1 small butternut squash

Directions

Preheat oven to 400ºF.  Cut the top and ends of the squash off and peel it. Split it into 1/4′s. What I mean by that is, right where the squash starts to turn bulbous, cut it in 1/2, width-wise. Split those two halves in half, lengthwise. This will make it much easier to cut into planks. Scrape out the seeds. Slice the squash into planks.  Roast the squash on a parchment lined baking sheet until tender, about 25 minutes.

While the squash is roasting, in a saute pan heat the oil and saute the onions, peppers, mushrooms and garlic.  Add the ground meat and Italian seasoning and continue to saute until the meat is browned.  Remove from heat and set aside.

Using a 9×9 oven safe baking dish, put down enough sauce to lightly cover the bottom of the dish. (This keeps the squash from sticking to the pan.) Next add a layer of squash planks and top with a layer of baby spinach, then spoon on the sausage mixture, followed by the sauce. Repeat until all your ingredients are used up (I usually get three layers)…trying to reserve enough sauce to cover the top of the lasagna, sprinkle the fresh basil over the top layer of sauce.

Cover the dish tightly with foil and bake for 45 minutes. Remove the foil and bake for an additional 15 minutes.  Look for a bubbly pan with a crispy, browned top. Right out of the oven, the lasagna may by liquidy, let it set for a good half hour before cutting into it, as it will solidify.  Serves 6 generously.

This recipe is shared at:

Gluten-Free Monday, Tempt My Tummy Tuesdays, Slightly Indulgent Tuesday, Tasty Tuesday, Fat Tuesday, Whole Foods Wednesday, Allergy Free Wednesday, Gluten-Free Wednesdays , Gluten Free Fridays, Fight Back Friday, Fill Those Jars Fridays

Mini Chocolate Chip Pecan Cookies

My very first job ever was at The Chocolate Chip Cookie Factory in Collin Creek Mall when I was 14 years old.  One of my favorite things to bake (and eat) when I worked there were the mini varieties of our most popular cookies.  We sold them by the half and bakers dozens and served them in a fun parchment paper cone to eat on the go!  What a treat to recreate this fond memory with much healthier ingredients…I loved cookies then and I love cookies now, especially ones that are gluten, grain and refined sugar-free.

Mini cookies in a paper cone…just like I remember them!

Mini Chocolate Chip Pecan Cookies

1 1/4 cup blanched almond flour

1/2 tsp sea salt

1/2 tsp baking soda

1/4 cup coconut oil or butter, melted

1/4 cup coconut nectar, maple syrup or honey

1 1/2 tsp vanilla

1/4 cup chocolate chips

1/4 cup chopped pecans

Preheat oven to 350 degrees F.  Line baking sheets with parchment paper.  In a large mixing bowl sift together almond flour, sea salt and baking soda.  In a smaller bowl whisk together coconut oil, coconut nectar and vanilla.  Combine wet ingredients into dry ingredients and stir in chocolate chips and pecans.  Drop by 1/2 Tbsp measure onto parchment and slightly flatten.  Bake 10-12 minutes or until lightly golden.  Remove to a wire rack to cool.  Enjoy!

Makes 24 bite-sized cookies.

This recipe is shared at:

Slightly Indulgent Tuesday, Fat Tuesday, Tasty Tuesday, Gluten-Free Wednesdays

Fight Back Friday, Fresh Bites Friday

Made From Scratch Monday

Spicy Bacon & Beef Cottage Pie

There have been a ton of Shepherd’s Pie and Cottage Pie recipes making an appearance in the Paleo blogosphere lately.  They all look so tasty and like a wonderful, warm comforting food…today it was snowing in Colorado so I thought it would be the perfect day to try to make one.  Elana’s Pantry posted this recipe for Paleo Shepherd’s Pie recently using cauliflower mash for the topping and a few months back Jan’s Sushi Bar posted this Sweet and Spicy Cottage Pie using mashed vanilla sweet potatoes on top.  Melissa Joulwan’s Well Fed Cookbook has a fabulous recipe with many variations for Shepherd’s Pie using the traditional ground lamb as well as recipe on her blog for Cottage-Flower Pie.  My version pulls things from all three recipes and I will have to say it was FABULOUS!  This was the first Cottage Pie I have ever made and it sure will not be my last!  I was pleased with the photos of the Cottage Pie before it went in the oven and with the ones of it dished out in my bowl…the one of the final product after it was baked is not the best simply because I think I used too small of a casserole dish so the filling bubbled up over the sides of the cauliflower mash (and made a huge mess in the oven!)…now in my defense, I’ve never made this dish before so this could very well be a normal occurrence!  I am calling this “Spicy” simply because it is just that, SPICY…I like it that way but if you prefer a milder flavor I would omit half of the black pepper and all of the red pepper flakes.

Spicy Bacon & Beef Cottage Pie

Spicy Bacon & Beef Cottage Pie (Serves 4)

1/2 pound nitrate/nitrite free bacon, coarsely chopped

1/2 pound ground organic grass-fed beef

2 Tbsp. butter or coconut oil

1/2 large onion, diced

1 garlic clove, minced

1 cup diced carrots

1/2 cup diced celery

2 cups chopped kale, stems removed

1 1/2 cups tomato sauce

1/2 tsp. sea salt

1/2 tsp. black pepper

1/2 tsp. crushed red pepper flakes

1/4 tsp. paprika

1 recipe Mashed Cauliflower

Preheat oven to 350 degrees F.  In a large skillet heat butter or oil over medium-high heat, saute onion until soft.  Add chopped bacon to the pan and saute until cooked, add carrots, celery and garlic and saute in the bacon fat until soft.  Add the ground beef to the pan with the bacon and vegetables and saute until browned.  Season the meat and vegetable mixture with the salt, pepper, red pepper flakes and paprika.  Stir in the tomato sauce, reduce the heat to medium-low and simmer for 15 – 20 minutes to allow the mixture to thicken.  Add the chopped kale and cook until the greens are wilted.  Transfer the meat and vegetable mixture to a casserole dish (the one I used was a 1.7L Pyrex…I’d go a bit bigger!).  Carefully spread the cauliflower mash (recipe follows) evenly over the top of the meat mixture.  Using the tines of a fork, lightly create some texture on top – the peaks and valleys make nice brown spots in the oven.  Bake for 20 – 30 minutes until the top begins to brown (I would have browned mine more but it was splattering all over the oven!).  Remove from oven and allow to rest for 5 – 10 minutes before serving.

Mashed Cauliflower

1 large head cauliflower, trimmed, chopped and steamed until very soft

1 garlic clove, minced

1 Tbsp. butter or coconut oil

2 Tbsp. heavy cream or coconut milk

salt and pepper, to taste

Place ingredients in a food processor and puree until smooth.

This recipe is shared at:

Fight Back Friday, Make Ahead Monday, Slightly Indulgent Tuesday, Tasty Tuesday, Fat Tuesday, Gluten-Free Wednesdays

Meat and Vegetable Mixture

Topped with Cauliflower Mash

The not-so-pretty finished product

Looks aren't everything...it tasted GREAT!

Green Chile Chicken Fajita Frittata

A Frittata by definition is an egg based dish similar to an omelette or Quiche, enriched with additional ingredients such as meats, cheeses, vegetables and pastas.  It may also be flavored with herbs.  Unlike an omelette, which is traditionally made to order for one, a frittata can be made in a larger pan, sliced and served family style.  Frittatas are extremely versatile, they are classically made for breakfast or brunch but are also great for a light supper.  I like my frittatas hot, however they are great at room temperature or even cold out of the refrigerator.  The possibilities are endless for ingredients and flavors…

Green Chile Chicken Frittata with Avocado Slices

Green Chile Chicken Fajita Frittata (serves 2 generously)

4 eggs

1 Tablespoon water

1/4 teaspoon chili powder

1/8 teaspoon salt

pinch of black pepper

1 – 4 oz can green chiles

1/2 cup chopped onion

1/2 cup chopped red pepper

4 medium mushrooms, diced

1 teaspoon minced garlic

4 ounces cooked chicken (breast, thigh or rotisserie)

Butter, coconut oil or lard

Sliced avocado, salsa and chopped cilantro for garnish

Preheat broiler.  Whisk eggs, water, chili powder, salt, pepper and green chiles in a medium bowl until frothy and set aside.  In a 10″ oven safe skillet melt fat over medium heat, add onions, peppers, mushrooms and garlic, cook until vegetables are soft.  Add chicken and stir to combine with vegetables.  Lower heat to medium-low.  Pour egg mixture evenly over chicken and vegetables.  Cook the frittata slowly until the eggs are set almost all the way through.  Shake the pan occasionally during cooking to ensure the frittata isn’t sticking to the bottom.  Place the pan under the broiler for 3 – 5 minutes to set the top of the frittata completely.  Remove from oven and let rest for 10 minutes before removing from the pan.  Slice and serve warm or at room temperature.  Garnish with avocado, salsa and chopped cilantro.

This recipe is shared at:

Fight Back Friday, Allergy Friendly Lunchbox Love, Make Ahead Monday, Tasty Tuesday, Slightly Indulgent Tuesday, Fat Tuesday, Gluten-Free Wednesdays

Magic Coconut Bars

 Everyone remembers the old-fashioned Magic Cookie Bars made with a graham cracker crust, butter, chocolate chips, pecans, flaked coconut and sweetened condensed milk…heavenly, caramelly, chocolatey yummi-ness…with a nice side of gluten gut bomb, a sugar rush and then the inevitable crash!

I occasionally make treats that are fruit-sweetened or completely unsweetened that I can enjoy as part of my grain-free “paleo-primal” lifestyle but every once in a while I like to make a full-on DESSERT.  Make no mistake here…this is a special occasion treat, great to make for a party or a crowd, definitely not one to make on a Saturday night when you are alone at home!  All in all as far as desserts go it’s really not too terrible, the entire thing only has 3 tablespoons of sweetener for sixteen servings (just about 1/2 teaspoon per serving)…again not bad if you are feeding a crowd, disastrous if you eat the entire thing by yourself.  It’s a bit labor intensive but SO worth it!

Magic Coconut Bars

Crust:

3/4 cup blanched almond flour

3/4 cup unsweetened shredded coconut

1/4 teaspoon sea salt

1 teaspoon vanilla

1 tablespoon coconut nectar, honey or maple syrup (optional)

1/4 cup coconut oil or butter, melted

Preheat oven to 350 degrees F. Line an 8×8 metal or glass dish with parchment paper so that it hangs over the sides for easy removal.  Combine all ingredients for the crust in a large bowl and press firmly into the prepared pan.  Bake for 12 – 15 minutes until golden brown.  Remove from oven and cool on wire rack while preparing the filling.

Magic Filling:

1 can full fat coconut milk (I use Native Forest)

2 Tablespoons coconut nectar, honey or maple syrup

1 Tablespoon vanilla

3/4 cup dark chocolate chips

3/4 cup unsweetened shredded coconut

3/4 cup chopped pecans

1/4 cup unsweetened coconut flakes

In a saucepan over medium heat bring coconut milk, sweetener and vanilla to a low boil, reduce heat and simmer for approximately 45 minutes, stirring frequently until it’s reduced by half.  The coconut milk mixture should be very thick, you should have about 3/4 cup once reduced, remove from heat and cool slightly.  Pour 1/2 of the condensed coconut milk over the crust and spread to the edges. Layer half of the shredded coconut, half of the chocolate chips and half of the pecans on top of the coconut milk and lightly press down on the toppings.  Add a second layer with the remaining shredded coconut, chocolate chips and pecans.  Pour remaining 1/2 of condensed coconut milk over the top of the layers.  Top with flaked coconut.

Bake for 30 minutes.  Remove from oven and cool for one hour (I KNOW!) on a cooling rack.  Next, place the pan in the refrigerator and cool for 2 hours (I KNOW, I KNOW!) or in a pinch cool in the freezer for 1 hour.  Gently lift the parchment out of the pan and place bars on a cutting board or other flat surface.  Using a large knife cut into 16 squares.

Magic...

This is a lovely treat to make for Valentine’s Day!

This recipe is shared at:

Fight Back FridayFresh Bites Friday, Wellness Weekend, Allergy Friendly Lunchbox Love, Make Ahead Monday, Tasty Tuesday, Slightly Indulgent Tuesday, Fat Tuesday

Cinnamon Swirl Raisin Bread

Cinnamon Swirly Goodness

When I was growing up my parents were somewhat “hippy-ish” which meant there were a lot of bran muffins and carob in our fridge.  My elementary school best friend (Regina) had parents that were from the country (East Texas) which meant biscuits, gravy and Wonder Bread cinnamon toast!  I’m thankful for my hippy parents because they taught me the importance of living healthy and eating clean…although we have come a long way from those bran muffin days into grain-free lifestyles!  I am equally thankful for all those wonderful memories of eating country meals at my friend’s house.  Regina’s mom sang in the choir at the First Baptist Church and Sunday mornings were usually pretty busy so it was always the morning for a quick breakfast of oven-toast.  Cheese or Cinnamon-Sugar were our choices.  I usually had one of each, the cheese toast was a slice of white bread with a square of American cheese toasted under the broiler until it was bubbly and crispy on top…the cinnamon-sugar was the same white bread buttered and sprinkled with a mixture of cinnamon and white sugar also broiled until toasty.  Both were pleasantly crispy on the top while the bottom was still that white bread soft doughy texture since they didn’t get flipped in the oven…it kind of makes my throat close up with the thought of it now but I do remember it tasting and smelling so yummy.  There is just something so comforting about the smell of cinnamon swirling through the house…especially when it’s coming from the oven!   Now, I don’t eat sweets all that often anymore but for some reason I had a hankering for cinnamon toast…I had a freshly baked loaf of Elana’s Pantry Paleo Bread in the freezer that I could have easily doctored up to make cinnamon toast but I was in the mood to experiment so I decided to try to make some Cinnamon Swirl Raisin Bread.  Well, it was a success, the bread has a nice texture warm out of the oven and in my opinion, even better toasted under the broiler and topped with a pat of pastured butter!  I started with a base of Elana’s Pantry Paleo Bread with a few modifications and then added the swirl of cinnamon, coconut nectar and raisins.  As you can see from the photo the raisins kind of sank to the bottom of the loaf in places, next time I will toss them in a bit of coconut flour before mixing them in so they don’t sink.

Cinnamon Swirl Raisin Bread

(yields 12-16 slices)

Base Bread Dough:

1 cup blanched almond flour

1/2 cup pecan meal

2 Tablespoons coconut flour

1/4 cup flax meal

1 1/2 teaspoons baking soda

5 eggs, room temperature

1/4 cup coconut oil, melted

1 Tablespoon apple cider vinegar

Cinnamon Swirl:

1/4 cup honey, maple syrup or coconut nectar

1/2 cup raisins, lightly coated in coconut flour

1 Tablespoon cinnamon

1 teaspoon coconut oil, melted

Preheat oven to 350 degrees F.  Grease a small loaf pan (I use a Magic Line 7.5 x 3.5 Loaf Pan) with coconut oil and set aside.  Place almond flour, pecan meal, coconut flour, flax meal and baking soda in the bowl of a food processor and pulse to combine.  Add eggs, coconut oil and apple cider vinegar and pulse until well combined scraping down sides once or twice.  In a large bowl mix together sweetener, cinnamon and 1 teaspoon of coconut oil until smooth, add raisins.  Gently fold in bread dough until just combined but also still a little swirled together.  Scoop mixture into prepared loaf pan and smooth the top with the back of spoon.  Place in middle of oven and bake for 30 minutes.  At the 30 minute mark check the loaf…sometimes this bread has a tendency to rise and separate on one side…if this happens I use a hot pad to press the top down evenly so it is flat.  Bake for 10 – 15 additional minutes.  Remove from the oven, run a butter knife around the edges of the loaf pan then cool in the pan for 10 minutes.  Remove from pan and finish cooling on a wire rack.  Slice and serve or wrap in parchment paper and store in an air tight container or gallon size zip top bag.

This recipe is shared at:

Fight Back Friday

Make Ahead Monday

Slightly Indulgent Tuesday, Fat Tuesday, Tasty Tuesday

Gluten Free Wednesday, Allergy-Free Wednesdays