No-Bake Crispy Peanut Butter Chocolate Squares

Crispy Peanut Butter Chocolate Squares

Peanut Butter Chocolate Bars have been around for ages…this recipe is actually adapted from a recipe for Peanut Butter Balls that has been passed down from my great-grandmother.  Most recipes call for graham cracker crumbs or rice crispy cereal but I like the crunch that the corn flakes add in this recipe, for an extra crispy texture I use crunchy peanut butter too.  I decided to make them into squares and add the layer of chocolate but they are equally good plain as bars, squares or balls! 

Crispy Peanut Butter Chocolate Squares

Ingredients:

1/2 cup sugar

1/2 cup organic corn syrup

1/2 tsp. vanilla

1/2 Tbsp. butter

1/2 cup crunchy peanut butter

1/8 tsp. salt

3 cups organic gluten-free corn flakes

6 oz. semi-sweet chocolate

Butter for greasing baking dish

Directions:

Grease an 8×8 baking dish with butter.

In a large mixing bowl, measure 3 cups corn flakes, crush the corn flakes with your hands until fine.  Add 1/8 tsp. salt and mix, set aside.

In a small saucepan bring the sugar and corn syrup to a boil and then quickly remove from heat.  Stir in vanilla, butter and peanut butter until smooth and creamy.

Pour peanut butter mixture into the corn flakes and stir to combine.  Press into the greased baking dish using a rubber spatula or a piece of waxed paper.

Melt the chocolate in the microwave or on the stove.  Pour over the peanut butter and corn flake mixture and spread evenly to the edges with an offset spatula.

Place the dish in the refrigerator until set.  Once the squares are set loosen the sides with a metal spatula taking care not to break the chocolate topping.  Turn the square out onto a sheet of waxed paper, chocolate side down.  Using a sharp knife cut the candy into 16 squares.

Crispy Peanut Butter Chocolate Squares

I like to serve the squares on a platter with some turned chocolate side up and some peanut butter side up…they will get softer at room temperature so keep them in the fridge until ready to serve.  We like them best at room temp.

Double Chocolate Peanut Butter Chip Brownies (Gluten Free)

Double Chocolate Chip Peanut Butter Chip Brownies

Anybody who has ever baked a pan of brownies from scratch knows that they can be tricky…under cook them and they are too gooey, over cook them and they are dry and crumbly and the edges are hard as bricks…it takes practice to get them just right.  Anybody who has ever baked a pan of gluten-free brownies from scratch has probably thrown more than one batch in the trash.  Well…I have to admit I’ve thrown more than one in trash, probably even more than ten.  Yikes.  Not only is it disappointing to not get it right or to not get the reward of a delicious chewy brownie after the labor but gluten-free ingredients ain’t cheap!!!!  I came across a recipe in Food and Wine Magazine last month that I just had to try…Oh boy, am I glad I did!!!!  These brownies came out just about perfect…I live at high altitude so next time I may try a few adjustments but I think the recipe is definitely a keeper.  I typically don’t bake with a lot of sugar so these will be reserved for special occasions because they are SUPER RICH and SUPER SWEET!!!  This recipe comes from Tully Phillips of Tu-Lu’s Bakery in New York City and Dallas…I can’t wait to visit them in person!!!

Double Chocolate Peanut Butter Chip Brownies

Ingredients:
3 sticks unsalted butter, cut into tablespoons, plus more for greasing
12 ounces semi-sweet or dark chocolate, finely chopped
3/4 cup plus 2 tablespoons white rice flour
3/4 cup tapioca flour
1/2 teaspoon kosher salt
6 large eggs
3 cups sugar
1 tablespoon pure vanilla extract
1 cup peanut butter chips
1/2 cup semi-sweet chocolate chips

Directions:
Preheat the oven to 350°. Lightly grease a 9-by-13-inch metal baking pan.

Place the 3 sticks of butter in a heat-proof bowl and set the bowl over a saucepan of simmering water (the bottom of the bowl should not touch the water). Melt the butter, stirring occasionally. Add the chopped chocolate and stir until melted. Remove the bowl from the heat.

In a small bowl, whisk the rice flour with the tapioca flour and salt. In a large bowl, whisk the eggs with the sugar and vanilla until blended. Fold in the dry ingredients until incorporated, then fold in the peanut butter chips and chocolate chips. Fold in the melted chocolate mixture. Scrape the batter into the prepared dish.

Bake for about 1 hour and 15 minutes, until the brownies are slightly puffed and a tester inserted in the center of the brownies comes out with a few moist crumbs attached. Transfer the pan to a rack and let cool completely before turning out the brownies and cutting them into bars.

The brownies can be stored in an airtight container at room temperature for 3 days, or wrapped in foil and frozen for up to 1 month.

***Recipe reprinted with permission from Tully Phillips and Jennifer Wells***

Double Chocolate Peanut Butter Chip Brownies 2
This recipe is shared at:

Chocolate PB Cupcakes

IMG_9517

Better late than never!  Sorry for the delay in posting this awesome recipe…

This recipe is adapted from my absolute favorite cupcake cookbook, Gluten Free Cupcakes by Elana Amsterdam

Chocolate Peanut Butter Cupcakes

Cupcakes:

1/2 cup blanched almond flour

1/4 cup coconut flour

1/4 cup unsweetened cocoa powder

1/4 tsp. Celtic sea salt

1/2 tsp. baking soda

4 large eggs, room temperature

2 Tbsp. coconut oil or butter, melted

1/2 cup maple syrup (or agave, honey or coconut palm nectar)

1/4 cup chopped peanuts (for topping)

Filling:

1/2 cup creamy roasted peanut butter (almond butter is nice too!)

1/4 cup maple syrup

1 tsp. vanilla

1/2 tsp. Celtic sea salt

Directions:

Preheat oven to 350° F.  Line 9 muffin cups with paper or silicone liners.

For the cupcakes, in a large bowl, combine the almond flour, coconut flour, cocoa powder, salt and baking soda.  In a separate medium bowl, whisk together the eggs, oil and maple syrup.  Blend the wet ingredients into the dry ingredients with a handheld mixer until thoroughly combined.

For the filling, in a small bowl combine the peanut butter, maple syrup, vanilla and salt and stir until smooth.

To assemble, spoon one tablespoon of the cupcake batter into the bottom of each muffin cup. Next, spoon one tablespoon of filling into each muffin cup.  Divide the remaining batter evenly between the muffin cups covering the filling completely.

Bake for 20-22 minutes or until a toothpick inserted about 1/2″ from the edge of the cupcake (to avoid the filling) comes out with only a few moist crumbs.  Remove from oven and let the cupcakes cool in the pan for 1 hour, then frost with ganache and top with chopped nuts.

Chocolate Ganache:

3/4 cup heavy cream

8 ounces dark chocolate chips or chopped

1 tsp. vanilla

pinch of salt

Place the chocolate in a medium bowl and set aside.  In a small sauce pan, bring the heavy cream to a boil and immediately remove from heat.  Pour over the chocolate and let sit for 5 minutes.  Add the vanilla and salt and whisk together until smooth.  Let the ganache cool to room temp and then place in the refrigerator to thicken, about 15 – 20 minutes.  Store any leftover ganache in a glass container in the refrigerator for up to 3 days.

This post is shared at:

5 Ingredient Monday, Slightly Indulgent Tuesday, Fat Tuesday, Tasty Tuesday, Gluten-Free Wednesday, Allergy Friendly Lunchbox Love, Allergy-Free Wednesday, Whole Food Wednesday, Gluten-Free Fridays, All Gluten Free Desserts, Wednesday Extravaganza

Flourless Peanut Butter Cookies (2 net carbs!)

IMG_3076

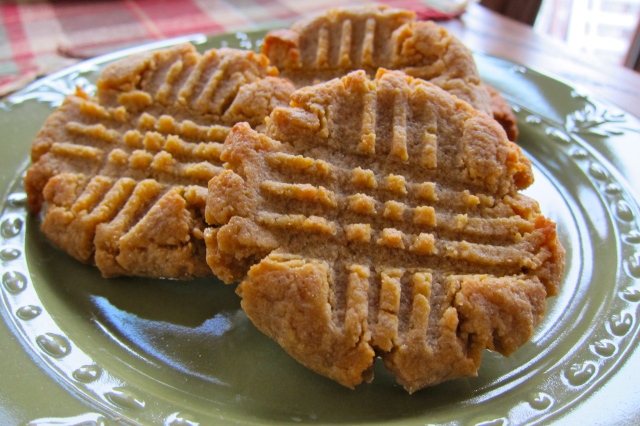
This has got to be one of the easiest cookie recipes on the planet!  It’s really just a standard flour-less peanut butter cookie recipe, I just replaced the sugar with erythritol and it’s only 4 ingredients, one mixing bowl, one spoon and one cookie sheet! Oh, and if you eat them all in one day then you won’t even need to dirty a container to store them in (although this is not recommended unless you are sharing!).

I am very new to the low-carb baking world so I am limited in my knowledge of sugar replacements…so far I have only successfully used Swerve Sweetener, which is erythritol.  It is highly recommended by Carolyn at All Day I Dream About Food, which is my absolute favorite low carb blog…she is a genius in the kitchen and every recipe I have tried has been AWESOME!  I like especially like Swerve since it subs 1:1 for sugar in just about any recipe…this takes all the guess-work out of substitutions also, it has no weird after-taste and won’t upset your digestive system!  I do also love stevia as a sweetener but I have yet to master using it alone in baking.  If you are not interested in a low carb version of this cookie it is easy to sub in your favorite unrefined sugar of choice, I think they would be fabulous with coconut palm sugar.

Low Carb Peanut Butter Cookies

Ingredients:

1 cup organic unsweetened peanut butter, room temperature
1 1⁄8 cup erythritol (I used Swerve)
1 egg
1 teaspoon vanilla extract

Directions:
Preheat oven to 350° F.  Line a large cookie sheet with parchment paper.In a large mixing bowl, combine peanut butter, 1 cup erythritol, egg, and vanilla, stir well with a spoon. Roll the dough into 1″ balls. Place the balls on the prepared baking sheet. With a fork, dipped in sugar replacement to prevent sticking, press a crisscross design on each cookie. Bake for 12 minutes, turning the cookie sheet halfway through baking, remove from the oven, and sprinkle the cookies with some of the remaining sugar replacement. Cool slightly before removing from the pan to a wire cooling rack.
Makes 16 cookies.

Grain-Free, Vegan PB&J Bars

Happy National Peanut Butter Day!

IMG_2872

In honor of National Peanut Butter Day I modified one of my favorite dessert bar recipes from Elana Amsterdam’s Gluten-Free Almond Flour Cookbook.  The Raspberry Bar recipe is simply scrumptious as is but today I thought I’d add a little oomph to it…and nothing goes better with jelly (for me, anyways!) than peanut butter!  The original recipe of course calls for Raspberry fruit spread but my favorite is Black Currant so that’s what I used, you can substitute your favorite flavor and any nut butter would work in place of the peanut butter. I replaced the egg in the recipe with a flax egg to make this a vegan-friendly treat as well.  These are great for an on-the-go snack too…I cut them up, wrap them in plastic wrap and freeze them, EASY!

PB&J Bars

Crust:

3 cups almond flour

1/2 tsp. salt

1/4 cup coconut oil, melted

1 Tbsp. vanilla extract

Blend the almond flour, salt, coconut oil and vanilla in a food processor or high-speed blender until a smooth dough forms.  Press the dough into a greased 9×13 baking dish.  Bake at 350 for 12-15 minutes, until lightly golden.  Prepare the topping and measure out the filling while the crust is baking.

IMG_2844

Filling:

1/2 cup peanut butter, room temperature or slightly warmed

1 cup fruit spread

Spread the peanut butter in a thin layer over the hot crust.  Top the peanut butter layer with your favorite fruit spread flavor, spreading evenly.

IMG_2846IMG_2850

Topping:

1 3/4 cups almond flour

1/4 tsp salt

1/2 tsp ground cinnamon

1/4 cup coconut oil, melted

2 Tbsp. coconut nectar

1 flax egg (1 Tbsp. flax meal mixed with 2 Tbsp. warm water…allow to thicken)

1 cup sliced almonds

Combine the almond flour, salt and cinnamon in a large bowl.  Stir in the coconut oil, coconut nectar and flax egg.  Gently fold in the almond slices.  Distribute the topping evenly over the fruit spread layer, pressing it down slightly with the back of a spoon.  Bake at 350 for 20-25 minutes or until the topping its lightly golden brown.  Let cool on a wire rack for 1 hour and then refrigerate.  Cut into bars and serve.  Makes 18-24 servings.

IMG_2854IMG_2869

This recipe is shared at:

Fight Back Fridays, Gluten-Free Fridays, Slightly Indulgent Tuesdays, Fat Tuesday, Tasty Tuesday, Tempt My Tummy Tuesday, Gluten-Free Wednesdays, Allergy-Free Wednesdays ,Wheat Free Wednesdays

The BEST Monster Cookie You Will EVER Eat!!!

Everyone knows who Cookie Monster is but what about a Monster Cookie?  Well, let me just tell ya…it’s the best cookie you will ever eat.  It’s chewy, chocolatey, peanut buttery bliss…all wrapped up in a big giant cookie!  Paula Deen has a recipe for a Monster Cookie that is full of store-bought candies, brown and white sugars, oats, eggs and of course tons of BUTTER and The Pioneer Woman’s recipe has white flour, rice crispy cereal AND two and a half sticks of butter for 18 cookies!  I stopped eating that kind of cookie years ago…but I came across a Monster Cookie at Whole Foods Market that I thought might be a better alternative…Ha, I was lucky enough to be able to get a peek at the recipe and decided DEFINITELY not a better option.  I actually calculated out the approximate calorie count for the cookie and it was well over 500 calories…per cookie!  Better ingredients don’t always make a healthier choice.  I have tried and tried to replicate the recipe using different ingredient options here and there and could never quite get it right…until today.  Now, let’s be clear…cookies are a treat and no matter what kind they are and how “healthy” the ingredients may be they still should be enjoyed on special occasions (yeah, yeah, yeah…I know, whatever!).  Anyway, cookies are my treat of choice so this recipe is a complete and total victory for me!

Bliss.

Monster Cookies

Ingredients

1/2 cup quinoa flour

2/3 cup quinoa flakes

1/2 tsp. baking soda

1/2 tsp. baking powder

1/2 tsp. cinnamon

1/4 tsp. celtic sea salt (omit if your peanut butter is salted)

1/4 cup butter, melted (or coconut oil for vegan option)

1/4 cup peanut butter (or roasted almond butter)

6 Tbsp. coconut palm sugar

1 Tbsp. maple syrup

1/2 tsp. vanilla

2 Tbsp. water, if needed

1/4 cup walnuts, chopped

1/4 cup dark chocolate chips

Directions

Position a rack in the center of the oven and preheat to 350°F. Line a large baking sheet with parchment paper.

In a medium bowl combine the quinoa flour, quinoa flakes, cinnamon, baking soda, baking powder and salt.   Stir to blend well. In a large bowl combine the sugar, peanut butter, melted butter (or oil), syrup and vanilla; whisk to blend. Using a flexible rubber spatula, gradually stir the dry ingredients into the peanut butter mixture, if the mixture is too dry and not holding together add the water by tablespoon until it’s combined. Stir in the walnuts and chocolate chips.

For each cookie, drop 2 generous tablespoons of batter onto the prepared sheet, spacing the mounds about 2 inches apart. (Or use an ice cream scoop.) Using moistened fingertips, flatten each to a 3-inch-diameter round.

Bake the cookies until brown and a bit firm to the touch, 17 to 20 minutes. Using a metal spatula, transfer the cookies to a rack and cool completely.

Makes 8 GIANT Cookies!

Cookies and Ice Cream…Does dessert get any better than a Cookie Sundae? I think not.

This recipe is shared at:

Slightly Indulgent Tuesday, Fat Tuesday, Tempt My Tummy Tuesday, Gluten-Free Wednesday, Allergy-Free Wednesday, Whole Foods Wednesday, Gluten-Free Friday, Fight Back Friday, Fill Those Jars Friday, Made From Scratch Monday

Cupcakes, Cupcakes, Cupcakes

Do you really need a special occasion to make a batch of cupcakes?  I think not, but…when I came upon this adorable cupcake display at Williams Sonoma last month I knew without a doubt that Easter dessert this year would be CUPCAKES!  At least this holiday occasion would give me the opportunity to make several different kinds and lots of them (the display holds 24-36)!!!  From all the wonderful flavors, fillings and frostings to choose from…here are the ones that made the cut…Carrot Cake with Cream Cheese Frosting is of course a must, being Easter and all…humm, you have got to have something chocolate so I settled on a Chocolate Fudge Cupcake with a Whipped Peanut Butter Cream Cheese Frosting…fruit? definitely, Raspberry filled Vanilla Cupcake with Dark Chocolate Ganache and a light and airy Lemon Ricotta Cheesecake Cupcake with Blueberries.  It was so much fun making and decorating these little treats but the real joy was sharing them with my family, especially since they were all grain-free, gluten-free and refined sugar-free!

The Final Four

My favorite was the Chocolate Fudge Cupcake with Whipped Peanut Butter Cream Cheese Frosting, for several reasons…1) it’s peanut butter and chocolate, 2) well, it’s peanut butter and chocolate and 3) should I say it again?  it’s peanut butter and chocolate.  This recipe is adapted from one that my grandmother makes called Carol’s Fudge Muffins, I don’t know who Carol is but this woman is a genius, these muffins are rich and fudgy but still light enough to be a cupcake rather than a brownie…Mama always made them with pecans and no frosting but I chose to omit the pecans this time since I was going to use a peanut butter frosting…they are equally delicious both ways!  Now, since I’ve been eating a mostly primal diet I don’t eat peanuts or peanut butter and would normally substitute almond butter in the frosting recipe but for Easter…its just got to be peanut butter!

Chocolate Fudge Cupcake

2 ounces dark chocolate (I used Dagoba Chocodrops 70%)

1/2 cup butter, melted

3/4 cup + 2Tbsp. coconut palm sugar

1/2 cup quinoa flour

2 eggs

1/2 tsp. vanilla

1 cup chopped pecans (optional)

Preheat oven to 325 F and line 12 muffin cups with paper or foil liners.

In a large bowl mix together flour and sugar.  In a small saucepan melt butter and chocolate and whisk until smooth.  Add butter and chocolate to flour mixture and stir until smooth.  Add slightly beaten eggs, stir in – do not beat.  Add vanilla and chopped nuts (if using).  Divide evenly between muffin cups.  Bake 22-25 minutes.  Cool on wire rack.

Whipped Peanut Butter Cream Cheese Frosting

8 oz cream cheese, softened

2 Tbsp. agave, honey or palm sugar

1 Tbsp. vanilla

pinch of sea salt

1/4 cup creamy peanut butter

1 cup cold heavy whipped cream

Beat cream cheese, peanut butter, agave, vanilla and sea salt on medium speed with an electric mixer until light and fluffy.  In a separate bowl beat heavy whip cream until stiff peaks form (for best results chill bowl and whisk in freezer before beating the whip cream).  Gently fold the whipped cream into the cream cheese mixture.  Frosting can be made one day ahead and stored in the refrigerator until ready to use.  Be sure cupcakes are completely cooled before frosting.

Chocolate Fudge Cupcake with Whipped Peanut Butter Cream Cheese Frosting