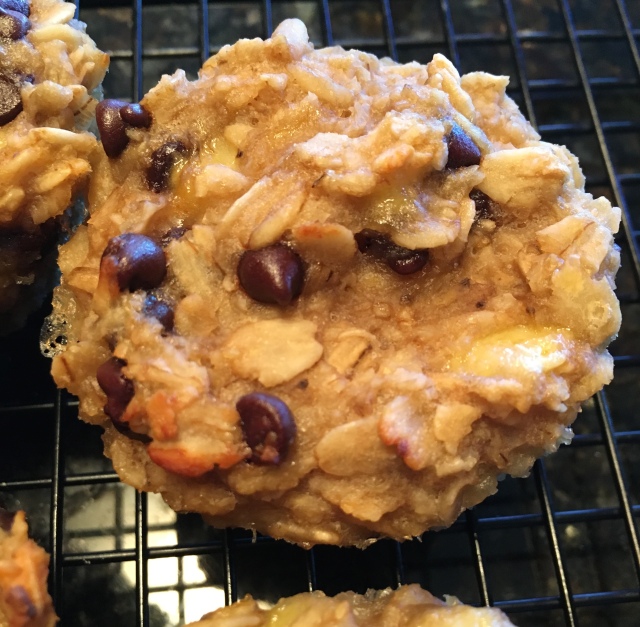
Gluten-Free Oatmeal Chocolate Chip Muffins

IMG_1897

Perfect for a healthy breakfast on the run…

Who doesn’t love a healthy grab-n-go breakfast?
This is a super easy make ahead recipe that is perfect for those mornings when you are racing out the door but don’t want to skip a healthy breakfast. One or two of these muffins heated in the microwave and you’ve got a tummy-warming oatmeal breakfast without the mess! Feel free to customize these to your liking, sub out the chocolate chips for raisins or dried cranberries, add a dash of cinnamon or use pumpkin in place of the banana…the options are endless.

Oatmeal Chocolate Chip Muffins

Ingredients (for 24 muffins):

5 cups gluten-free rolled oats (I used Bob’s Red Mill)

1 tsp. salt

2/3 cup mini chocolate chips

2 1/2 cups mashed ripe bananas

5 Tbsp. honey or maple syrup

2 1/3 cup water

5 Tbsp. coconut oil, melted

2 1/2 tsp. vanilla extract

Instructions:

Preheat oven to 375º F. Line 24 muffin cups with silicone liners.

In a large mixing bowl, combine oats, salt and mini chocolate chips. In a separate bowl whisk together mashed banana, sweetener, water, oil and vanilla. Mix wet ingredients into dry ingredients, combine thoroughly. Divide evenly into muffin cups. These don’t rise so a heaping 1/4 cup of batter is enough to fill the muffin cup without running over.

Bake for 20 minutes, rotating pans 180º after 10 minutes. Remove from oven and cool on wire racks. Freeze in airtight container or plastic freezer bags.
IMG_1899

Glazed Lemon Muffins

IMG_1481

I’m not sure what my problem is with lemon but…I just don’t like the sound of it in my food.  I’m not saying that I don’t like the taste of it once it’s there but recipes like Lemon Bars, Lemon Pie, Lemon Dill Salmon, Lemon Chicken NEVER appeal to me…meaning I would never tear a recipe out of a magazine or order off a menu anything with lemon (or lime, for that matter!) in the title.  Weird, I know.  Especially since I enjoy the taste of pretty much each and every recipe I’ve encountered with those very ingredients!   I rarely make anything lemon or lime either.

According to my mother my dad LOVES lemon desserts, however, he is also a chocoholic (like me) so it never really occurred to me that he would actually want a lemon dessert over chocolate.  So, in honor of Father’s Day I prepared these delicious looking and smelling Glazed Lemon Muffins.  We will see if he is pleasantly surprised with lemon but I will surely have something chocolate prepared as back up!  My mom says they just might be her favorite dessert I’ve prepared…Humm…maybe, just maybe, she is the one who loves lemon desserts because she sure doesn’t like the chocolate ones… 😉

  This recipe is adapted from Kelly’s recipe for Lemon Bread at Primally Inspired.

Glazed Lemon Muffins

Muffins:

3 eggs

2 Tbsp. coconut oil or butter, melted

zest and juice from one lemon (about 1/4 cup)

1/4 cup almond milk

3 Tbsp. maple syrup or honey

1/3 cup coconut flour, sifted

1/2 tsp. baking soda

1/8 tsp. Celtic sea salt

Glaze:

1 Tbsp. coconut oil or butter

1 Tbsp. maple syrup or honey

1 Tbsp. almond milk

zest and juice from 1/2 a lemon (about 2 Tbsp.)

1/4 tsp. vanilla

Directions:

Preheat oven to 350° F.  Line a muffin tin with 6 silicone muffin cups or grease the tin very well with coconut oil.

In a small saucepan combine the ingredients for the glaze, bring to a simmer over medium-low heat.  Simmer for 5 minutes, stirring constantly then remove from heat and allow to cool for 45-60 minutes.

In a large bowl whisk together the eggs, coconut oil, almond milk and maple syrup.  Stir in the coconut flour, baking soda and sea salt. Mix until well combined.  Divide equally between the muffin liners, about 1/4 cup each.  Bake for 20-22 minutes or until the tops are slightly golden and a toothpick inserted in the middle comes out clean.  Allow the muffins to cool in the tin on a wire rack for about 30 minutes.

Remove the muffins from the silicon cups or muffin tin and set on the wire rack, place a piece of parchment paper under the wire rack to catch the glaze drizzle.  Drizzle the glaze over the muffins as desired and then place in the refrigerator to set the glaze for about 30 minutes.

Makes 6 muffins.

IMG_1475

This post is shared at:

5 Ingredient Monday, Slightly Indulgent Tuesday, Fat Tuesday, Tasty Tuesday, Gluten-Free Wednesday, Allergy Friendly Lunchbox Love, Wednesday Extravaganza, Allergy-Free Wednesday, Whole Food Wednesday, Gluten-Free Fridays, All Gluten Free Desserts

Italian Bacon~Spinach~Tomato Mini Frittatas

This a simple recipe that uses fresh and flavorful ingredients and it’s easy to put together.  I used raw milk cheese in mine but if you are dairy-free you can simply leave it out.  Enjoy this high protein, low carb dish for breakfast, lunch or dinner with a nice side salad or even some oven-roasted sweet potatoes.

Pastured eggs, nitrate-free bacon, vine ripe tomatoes, baby spinach and raw milk cheese…beautiful!

Italian Bacon~Spinach~Tomato Mini Frittatas

This recipe makes two servings (the photo above was for one).

Ingredients:

4 pastured eggs

4 strips bacon, cooked and crumbled

2 ounces mozzarella cheese, shredded

2 large tomatoes, sliced thin and seeded

1 ounce baby spinach

2 tsp. grated Parmesan cheese

2 tsp. Italian seasoning

salt and pepper

Directions:

Preheat oven to 350 degrees F.  Grease 4 ramekins or 2 individual size serving dishes, set aside.

In a small bowl whisk together eggs and Italian seasoning.

In each dish layer tomatoes, spinach, cheese and bacon…depending on the size of your dish you should have enough room to repeat the layers.

Pour the whisked eggs over the layered ingredients evenly (about 1/4 cup in each ramekin).

Sprinkle with 1/2 tsp. Parmesan cheese.

Bake for 20-25 minutes or until the eggs are set.

Baked to perfection!

You can pop these easily out of the ramekins or serve them directly in the baking dish.  Either way…Delish!

This recipe is shared at:

Fill Those Jars Fridays, Fresh Bites Fridays, Slightly Indulgent Tuesday, Fat Tuesday, Gluten-Free Wednesdays, Whole Foods Wednesdays, Made From Scratch Mondays

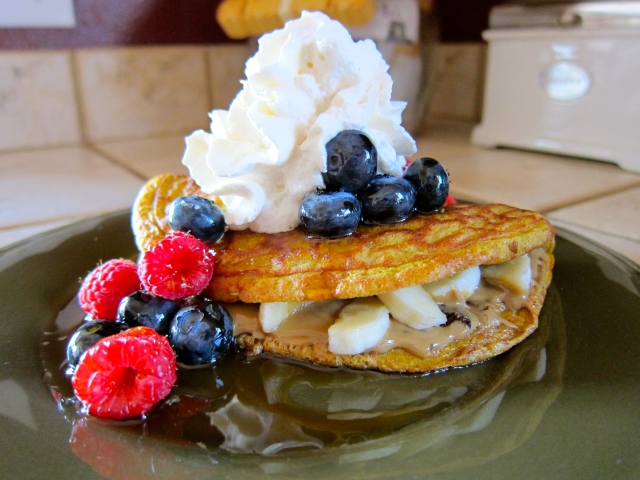
Stuffed Ricotta Omelet with Fresh Berries

Peanut Butter Stuffed French Toast has long been one of my favorite comfort food breakfasts.  Since going grain and legume free that breakfast treat has been off the menu…until now.  The recipe I’m sharing includes my favorite fillings and toppings but, of course, the options are endless…so substitute your favorites.  This recipe also includes dairy but would probably work with substituting coconut milk for the ricotta, although I haven’t tried it.

My new comfort food breakfast…or dessert.
This is a pic of my dad’s birthday breakfast so for an extra treat
I added a few dark chocolate chips to the omelet before flipping it! Oh my…

Sweet Ricotta Omelet (Serves 1)

2 eggs

2 Tbsp. ricotta cheese

1/4 tsp vanilla

1/4 tsp cinnamon

8 drops liquid stevia (1 Tbsp. sweetener of your choice)

1/16 tsp. baking soda

Filling:

1-2 Tbsp. almond butter

1/2 banana, sliced

Topping:

1/2 cup berries

1 Tbsp. maple syrup

fresh whipped cream

Directions:

Heat a lightly greased 8″ omelet pan over medium heat. Whisk together eggs, ricotta, vanilla, cinnamon, stevia and baking soda until smooth.  Place berries in a small bowl, heat maple syrup (I microwave it for about 15 seconds) and then pour it over the berries and set aside.  Pour egg mixture into the omelet pan and cook until the eggs are almost set.  Turn off the heat, carefully flip omelet and leave in the pan until cooked through (only about one minute or so more).  Slide omelet onto a plate, spread almond butter on one half of the omelet and top with sliced banana, fold the other side over.  Pour berries and maple syrup over the folded omelet and top with fresh whipped cream.  Enjoy!

This recipe is shared at:

Fight Back Friday, Fresh Bites Friday, Gluten Free Friday

Tastetastic Thursday

Made From Scratch Monday, Fat Tuesday, Slightly Indulgent Tuesday, Gluten-Free Wednesdays

Tasty Tuesday

Fill Those Jars Fridays

Grain-Free Cinnamon Coffee Cake with Maple Drizzle

Grain-Free Coffee Cake with Maple Drizzle

Breakfast is the most important meal of the day for me…no matter what time of day I eat it.  I generally like to have bacon and eggs, omelets, frittatas or sometimes even coconut pancakes but every once in a while on the weekends or for holidays a nice sweet treat served with homemade spicy sausage is where it is at!  This recipe is adapted from one in Elana Amsterdam’s Gluten-Free Almond Flour Cookbook and is truly the best gluten-free, grain-free, refined sugar-free coffee cake I’ve ever eaten…as a matter of fact it is better than any coffee cake I’ve ever had that was full of sugar, gluten and grain!!!

This past Friday was my mom’s birthday followed by Mother’s Day on Sunday so I thought I’d treat my mom, dad and husband (and let’s be honest…ME, too) to a fun, decadent breakfast dessert…and it really hit the spot!

Out of the oven…resting.

Grain-Free Cinnamon Coffee Cake (makes 9-12 servings):

2 1/2 cups blanched almond flour
1/4 tsp sea salt
1/2 tsp baking soda
1/2 cup pecans, coarsely chopped
1/2 cup raisins
1/4 cup butter or coconut oil, melted
1/4 cup maple syrup
2 large eggs
1 tsp. vanilla

Topping:
3 Tbsp. ground cinnamon
3 Tbsp. butter or coconut oil, melted
6 Tbsp. maple syrup
1/2 cup sliced almonds or chopped pecans

Preheat the oven to 350 degrees F. Grease an 8-inch square baking dish or pan with butter or coconut oil and lightly dust with almond flour.

To make the cake:

Combine the almond flour, salt, baking soda, pecans and raisins in a large bowl.  In a medium bowl, whisk together the melted butter or coconut oil, maple syrup, eggs and vanilla.  Make a well inside the dry ingredients and pour the wet ingredients into the well.  Stir the wet ingredients into the dry ingredients until thoroughly combined, the batter will be very thick.  Scrape the batter into the prepared baking dish. Using a spatula, gently push the batter into place making it as level as possible.

To make the topping:

Combine cinnamon, butter or coconut oil, maple syrup and pecans or almonds in a bowl.  Spread the topping over the cake batter. 

Bake for 25-35 minutes, until a toothpick inserted into the center of the cake comes out clean. Let the cake cool in the pan for 1 hour on a wire rack.  Slice cake into squares and drizzle with Maple Frosting before serving.

This cake can be stored in an airtight container at room temperature for several days.  Once you drizzle it, store it in the fridge.

Maple Drizzle:

3/4 cup coconut butter

1/4 cup pure maple syrup (or more to taste)

1/4-1/2 cup heavy whipping cream, almond milk, or coconut milk

pinch of salt

In a small saucepan, heat all ingredients over medium-low heat, stir until well combined.  Consistency should be thin enough to drizzle over the coffee cake.

***If you eat dairy and prefer a maple cream cheese drizzle…substitute 4 ounces softened cream cheese for the coconut butter and reduce the heavy cream to 2 Tbsp.-1/4 cup and blend in a small bowl with a hand mixer until smooth.  Again the consistency should be thin enough to drizzle***

This coffee cake is delightful with or without the drizzle.

This recipe is shared at: Slightly Indulgent Tuesday, Tasty Tuesday, Tasty Tuesday, Gluten-Free Wednesdays, Whole Foods Wednesdays, Fight Back Friday, Beyond the Peel

No drizzle necessary for complete yummi-ness!

But then again…why not just go for it!

Banana Walnut Pancakes

Banana Walnut Pancakes with Maple Syrup

Sometimes you just gotta have pancakes.

Well, I do anyways.  I’m sure I’ve mentioned before that breakfast is my favorite meal of the day…no matter what time I eat it!  I don’t make pancakes all that often, usually only for a special occasion breakfast (think…birthday or holiday) but tonight I just felt like having a comforting meal.  Shannon at Nourishing Days has created the absolute best recipe for Fluffy Coconut Flour Pancakes I’ve ever tried…I’ve made this recipe dozens of times using both coconut milk and heavy cream and they always turn out great!  Below I’ve posted the recipe I use regularly, which is her original recipe halved with a touch of cinnamon added.  If you do have leftovers they freeze well.  My favorite topping for pancakes or waffles will always be maple syrup, bananas and walnuts, I rarely stray from that combo but you could top your pancakes with anything you like…or they are even great with just a dollop of butter or drizzle of coconut butter!

 Coconut Flour Pancakes (makes 6-8 pancakes)

2 eggs

1/2 cup coconut milk or heavy cream

1/2 Tbsp. coconut nectar or honey (optional)

1/2 Tbsp. vanilla

1/4 cup coconut flour

1/2 tsp. cinnamon

1/2 tsp. baking soda

1/4 tsp. sea salt

coconut oil or butter for the pan

  1. Preheat griddle over medium-low heat. In a small bowl beat eggs until frothy, about two minutes. Mix in milk, vanilla, and sweetener.
  2. In a medium-sized bowl combine coconut flour, baking soda, cinnamon and sea salt and whisk together. Stir wet mixture into dry until coconut flour is incorporated.
  3. Grease pan with butter or coconut oil. Ladle a few tablespoons of batter into pan for each pancake. Spread out slightly with the back of a spoon. The pancakes should be 2-3 inches in diameter and fairly thick. Cook for a few minutes on each side, until the tops dry out slightly and the bottoms start to brown. Flip and cook an additional 2-3 minutes.
  4. Serve hot with butter, coconut oil, honey, syrup, or fruit.

This recipe is shared at:

Gluten-Free Wednesdays, Fat Tuesday, Slightly Indulgent Tuesday, Tasty Tuesday, Fight Back Friday

Green Chile Chicken Fajita Frittata

A Frittata by definition is an egg based dish similar to an omelette or Quiche, enriched with additional ingredients such as meats, cheeses, vegetables and pastas.  It may also be flavored with herbs.  Unlike an omelette, which is traditionally made to order for one, a frittata can be made in a larger pan, sliced and served family style.  Frittatas are extremely versatile, they are classically made for breakfast or brunch but are also great for a light supper.  I like my frittatas hot, however they are great at room temperature or even cold out of the refrigerator.  The possibilities are endless for ingredients and flavors…

Green Chile Chicken Frittata with Avocado Slices

Green Chile Chicken Fajita Frittata (serves 2 generously)

4 eggs

1 Tablespoon water

1/4 teaspoon chili powder

1/8 teaspoon salt

pinch of black pepper

1 – 4 oz can green chiles

1/2 cup chopped onion

1/2 cup chopped red pepper

4 medium mushrooms, diced

1 teaspoon minced garlic

4 ounces cooked chicken (breast, thigh or rotisserie)

Butter, coconut oil or lard

Sliced avocado, salsa and chopped cilantro for garnish

Preheat broiler.  Whisk eggs, water, chili powder, salt, pepper and green chiles in a medium bowl until frothy and set aside.  In a 10″ oven safe skillet melt fat over medium heat, add onions, peppers, mushrooms and garlic, cook until vegetables are soft.  Add chicken and stir to combine with vegetables.  Lower heat to medium-low.  Pour egg mixture evenly over chicken and vegetables.  Cook the frittata slowly until the eggs are set almost all the way through.  Shake the pan occasionally during cooking to ensure the frittata isn’t sticking to the bottom.  Place the pan under the broiler for 3 – 5 minutes to set the top of the frittata completely.  Remove from oven and let rest for 10 minutes before removing from the pan.  Slice and serve warm or at room temperature.  Garnish with avocado, salsa and chopped cilantro.

This recipe is shared at:

Fight Back Friday, Allergy Friendly Lunchbox Love, Make Ahead Monday, Tasty Tuesday, Slightly Indulgent Tuesday, Fat Tuesday, Gluten-Free Wednesdays

Cinnamon Swirl Raisin Bread

Cinnamon Swirly Goodness

When I was growing up my parents were somewhat “hippy-ish” which meant there were a lot of bran muffins and carob in our fridge.  My elementary school best friend (Regina) had parents that were from the country (East Texas) which meant biscuits, gravy and Wonder Bread cinnamon toast!  I’m thankful for my hippy parents because they taught me the importance of living healthy and eating clean…although we have come a long way from those bran muffin days into grain-free lifestyles!  I am equally thankful for all those wonderful memories of eating country meals at my friend’s house.  Regina’s mom sang in the choir at the First Baptist Church and Sunday mornings were usually pretty busy so it was always the morning for a quick breakfast of oven-toast.  Cheese or Cinnamon-Sugar were our choices.  I usually had one of each, the cheese toast was a slice of white bread with a square of American cheese toasted under the broiler until it was bubbly and crispy on top…the cinnamon-sugar was the same white bread buttered and sprinkled with a mixture of cinnamon and white sugar also broiled until toasty.  Both were pleasantly crispy on the top while the bottom was still that white bread soft doughy texture since they didn’t get flipped in the oven…it kind of makes my throat close up with the thought of it now but I do remember it tasting and smelling so yummy.  There is just something so comforting about the smell of cinnamon swirling through the house…especially when it’s coming from the oven!   Now, I don’t eat sweets all that often anymore but for some reason I had a hankering for cinnamon toast…I had a freshly baked loaf of Elana’s Pantry Paleo Bread in the freezer that I could have easily doctored up to make cinnamon toast but I was in the mood to experiment so I decided to try to make some Cinnamon Swirl Raisin Bread.  Well, it was a success, the bread has a nice texture warm out of the oven and in my opinion, even better toasted under the broiler and topped with a pat of pastured butter!  I started with a base of Elana’s Pantry Paleo Bread with a few modifications and then added the swirl of cinnamon, coconut nectar and raisins.  As you can see from the photo the raisins kind of sank to the bottom of the loaf in places, next time I will toss them in a bit of coconut flour before mixing them in so they don’t sink.

Cinnamon Swirl Raisin Bread

(yields 12-16 slices)

Base Bread Dough:

1 cup blanched almond flour

1/2 cup pecan meal

2 Tablespoons coconut flour

1/4 cup flax meal

1 1/2 teaspoons baking soda

5 eggs, room temperature

1/4 cup coconut oil, melted

1 Tablespoon apple cider vinegar

Cinnamon Swirl:

1/4 cup honey, maple syrup or coconut nectar

1/2 cup raisins, lightly coated in coconut flour

1 Tablespoon cinnamon

1 teaspoon coconut oil, melted

Preheat oven to 350 degrees F.  Grease a small loaf pan (I use a Magic Line 7.5 x 3.5 Loaf Pan) with coconut oil and set aside.  Place almond flour, pecan meal, coconut flour, flax meal and baking soda in the bowl of a food processor and pulse to combine.  Add eggs, coconut oil and apple cider vinegar and pulse until well combined scraping down sides once or twice.  In a large bowl mix together sweetener, cinnamon and 1 teaspoon of coconut oil until smooth, add raisins.  Gently fold in bread dough until just combined but also still a little swirled together.  Scoop mixture into prepared loaf pan and smooth the top with the back of spoon.  Place in middle of oven and bake for 30 minutes.  At the 30 minute mark check the loaf…sometimes this bread has a tendency to rise and separate on one side…if this happens I use a hot pad to press the top down evenly so it is flat.  Bake for 10 – 15 additional minutes.  Remove from the oven, run a butter knife around the edges of the loaf pan then cool in the pan for 10 minutes.  Remove from pan and finish cooling on a wire rack.  Slice and serve or wrap in parchment paper and store in an air tight container or gallon size zip top bag.

This recipe is shared at:

Fight Back Friday

Make Ahead Monday

Slightly Indulgent Tuesday, Fat Tuesday, Tasty Tuesday

Gluten Free Wednesday, Allergy-Free Wednesdays

Warm Pear & Pecan Flaugnarde

Flaugnarde is a flan-like baked French dessert with fruit arranged in a buttered dish and covered with a thick flan-like batter.  Similar to a clafoutis which is made with black cherries, a flaugnarde is made with apples, peaches, pears, plums, prunes or other fruits. Resembling a large pancake, the dish can be served either warm or cold.

Pear & Pecan Flaugnarde

Most people think of this dish as a dessert but it can easily be enjoyed for breakfast as well!  This recipe uses heavy cream and butter but if you prefer a dairy-free dish substitute 3/4 cup full fat canned coconut milk for the cream and butter and use coconut oil to grease the dish.  I have made it both ways and they are equally delicious.  You will notice there is an option to add sweetener, I try to use the ripest, sweetest seasonal fruit available so I generally don’t need the added stevia or honey.  Please note…since completing the Whole 30 program I find that I don’t like anything too sweet anymore so be sure to adjust according to your family’s taste.  This is lovely topped with fresh whipped cream or drizzled with coconut butter when enjoying it for dessert or with a nice side of bacon or sausage at breakfast!

Pear & Pecan Flaugnarde (serves 8)

Ingredients:

butter for greasing baking dish

4 eggs

1/2 cup heavy cream

4 tablespoons butter, melted

1/4 cup pecan halves, finely ground

1 teaspoon vanilla extract

1 teaspoon cinnamon, divided

1/4 teaspoon stevia or 1/4 cup coconut sugar or honey (optional, I don’t use any sweetener)

1/4 teaspoon celtic sea salt

3 medium ripe pears, peeled, cored and sliced thin

2 tablespoons chopped pecans

Directions:

Preheat oven to 375 degrees F.  Generously grease a 9 inch pie or tart dish, ceramic works best, set aside.  Peel, core and slice pears.  Arrange pears in the greased dish and sprinkle with 1/2 teaspoon cinnamon.  In a blender or food processor combine eggs, cream, butter, ground pecans, vanilla, remaining cinnamon, sweetener (if using) and sea salt.  Blend or process until smooth, batter will be thin.  Pour batter evenly over the arranged pears, sprinkle with chopped pecans.  Bake for 40-50 minutes until golden brown, puffed and set in the middle.  Cool for at least 30 minutes before serving.

Arranged pears in greased tart dish

This recipe is shared at:

Fight Back Friday, Make Ahead Monday, Slightly Indulgent Tuesday, Fat Tuesday, Gluten-Free Wednesday

Proscuitto and Spinach Egg Cups

Prosciutto and Spinach Egg Cups

Prosciutto egg cups are an easy grab and go breakfast idea or a lovely main dish served alongside a green salad for a light lunch.  They are easily adaptable to your family’s preferences for veggies and you can certainly add cheese to the mix if you include dairy in your diet.  I like to bake up a batch of these and freeze them for travel…they give me plenty of protein when I’m on the go and I can even enjoy them at room temperature when I’m on the airplane.

Now, you will notice that this recipe uses a combination of whole eggs and egg whites (gasp!)…please don’t misunderstand me here…I LOVE whole eggs and wholeheartedly believe in eating egg yolks but sometimes I like a little bit of a lighter egg dish and I find that this combination works well for me.  If you prefer to use whole eggs for the entire recipe…go for it…or you can always save the egg yolks and make some Caramelized Banana Dairy-Free Ice Cream!!

Prosciutto and Spinach Egg Cups

Serves 4 (2 egg cups each)

4 eggs

1 cup egg whites

12 slices prosciutto, cut in half

1/2 onion, chopped

8 medium mushrooms, chopped

8 ounces baby spinach

salt and pepper to taste

oil or butter for sauteing veggies and greasing ramekins

Preheat oven to 400 degrees F.  Grease bottom and sides of eight ramekins.  Line each ramekin with prosciutto (mine took 1.5 pieces to completely cover each one) and set aside.  In a bowl, whisk together eggs, egg whites, salt and pepper until frothy, set aside.

In a large skillet, heat butter or oil and saute onions and mushrooms until tender.  Add the spinach and stir until just wilted making sure the veggies are all mixed together. Add a pinch of salt and some pepper, if desired.  Divide the veggie mixture evenly  into the ramekins and press down so that they are tightly pressed in the ramekin.  Divide whisked eggs evenly into the ramekins (I found that each one holds about 6 Tbsp of egg mixture).  Place all of the ramekins on a cookie sheet and bake in the oven for 20 minutes or until eggs are set in the middle.  Remove from oven and let rest for 5 minutes.  Pop the egg cups out of the ramekin and enjoy!

Recipe Variations:

  • onion, broccoli and red pepper
  • asparagus, garlic and shallots
  • zucchini, purple onion and tomato
  • 4 ounces Gruyère or Swiss cheese added to the egg mixture
  • 1 Tbsp. Italian or Adobo seasoning added to the whisked eggs

This recipe is shared at:

Make Ahead Monday, Fat Tuesday, Tasty Tuesday, Tempt My Tummy Tuesdays, Slightly Indulgent Tuesday

Gluten Free Wednesdays, Fight Back Friday