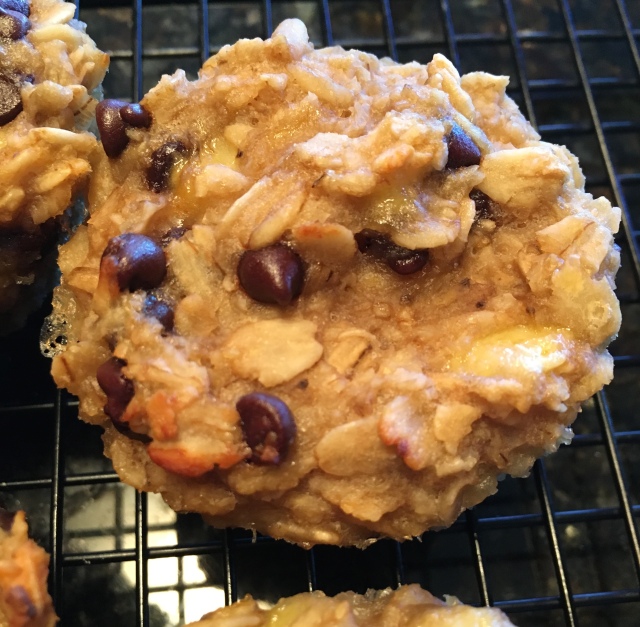
Gluten-Free Oatmeal Chocolate Chip Muffins

IMG_1897

Perfect for a healthy breakfast on the run…

Who doesn’t love a healthy grab-n-go breakfast?
This is a super easy make ahead recipe that is perfect for those mornings when you are racing out the door but don’t want to skip a healthy breakfast. One or two of these muffins heated in the microwave and you’ve got a tummy-warming oatmeal breakfast without the mess! Feel free to customize these to your liking, sub out the chocolate chips for raisins or dried cranberries, add a dash of cinnamon or use pumpkin in place of the banana…the options are endless.

Oatmeal Chocolate Chip Muffins

Ingredients (for 24 muffins):

5 cups gluten-free rolled oats (I used Bob’s Red Mill)

1 tsp. salt

2/3 cup mini chocolate chips

2 1/2 cups mashed ripe bananas

5 Tbsp. honey or maple syrup

2 1/3 cup water

5 Tbsp. coconut oil, melted

2 1/2 tsp. vanilla extract

Instructions:

Preheat oven to 375º F. Line 24 muffin cups with silicone liners.

In a large mixing bowl, combine oats, salt and mini chocolate chips. In a separate bowl whisk together mashed banana, sweetener, water, oil and vanilla. Mix wet ingredients into dry ingredients, combine thoroughly. Divide evenly into muffin cups. These don’t rise so a heaping 1/4 cup of batter is enough to fill the muffin cup without running over.

Bake for 20 minutes, rotating pans 180º after 10 minutes. Remove from oven and cool on wire racks. Freeze in airtight container or plastic freezer bags.
IMG_1899

Green Chile Chicken Fajita Frittata

A Frittata by definition is an egg based dish similar to an omelette or Quiche, enriched with additional ingredients such as meats, cheeses, vegetables and pastas.  It may also be flavored with herbs.  Unlike an omelette, which is traditionally made to order for one, a frittata can be made in a larger pan, sliced and served family style.  Frittatas are extremely versatile, they are classically made for breakfast or brunch but are also great for a light supper.  I like my frittatas hot, however they are great at room temperature or even cold out of the refrigerator.  The possibilities are endless for ingredients and flavors…

Green Chile Chicken Frittata with Avocado Slices

Green Chile Chicken Fajita Frittata (serves 2 generously)

4 eggs

1 Tablespoon water

1/4 teaspoon chili powder

1/8 teaspoon salt

pinch of black pepper

1 – 4 oz can green chiles

1/2 cup chopped onion

1/2 cup chopped red pepper

4 medium mushrooms, diced

1 teaspoon minced garlic

4 ounces cooked chicken (breast, thigh or rotisserie)

Butter, coconut oil or lard

Sliced avocado, salsa and chopped cilantro for garnish

Preheat broiler.  Whisk eggs, water, chili powder, salt, pepper and green chiles in a medium bowl until frothy and set aside.  In a 10″ oven safe skillet melt fat over medium heat, add onions, peppers, mushrooms and garlic, cook until vegetables are soft.  Add chicken and stir to combine with vegetables.  Lower heat to medium-low.  Pour egg mixture evenly over chicken and vegetables.  Cook the frittata slowly until the eggs are set almost all the way through.  Shake the pan occasionally during cooking to ensure the frittata isn’t sticking to the bottom.  Place the pan under the broiler for 3 – 5 minutes to set the top of the frittata completely.  Remove from oven and let rest for 10 minutes before removing from the pan.  Slice and serve warm or at room temperature.  Garnish with avocado, salsa and chopped cilantro.

This recipe is shared at:

Fight Back Friday, Allergy Friendly Lunchbox Love, Make Ahead Monday, Tasty Tuesday, Slightly Indulgent Tuesday, Fat Tuesday, Gluten-Free Wednesdays

Garlic, Rosemary and Chive Muffins

 This is a wonderful savory muffin that will be a lovely complement to any holiday meal!

Ready to serve up with some grass-fed butter!

Garlic, Rosemary and Chive Muffins

Makes 12 muffins

2 1/4 cups blanched almond flour

1 1/2 tsp sea salt

3/4 tsp baking soda

6 Tbsp garlic infused olive oil

4 large eggs

2 egg whites

1/2 cup fresh chives, chopped

1/4 cup fresh rosemary, finely chopped

pinch of freshly ground black pepper

Preheat oven to 350 degrees.  Line a muffin tin with paper liners or lightly grease with coconut oil.  In a large mixing bowl combine almond flour, sea salt, baking soda and black pepper, set aside.  In a separate bowl whisk together olive oil, eggs and egg whites until frothy.  Blend the wet mixture into the dry mixture using a handheld mixer until thoroughly combined, fold in chives and rosemary.  Divide evenly between the muffin cups (I use an ice cream scoop or 1/4 cup measuring cup).  Bake for 25-30 minutes or until they pass the toothpick test.  Remove from oven and cool in the pan on a wire rack for 20 minutes, serve warm with a pat of butter.

Garlic, Rosemary and Chive Muffins

This recipe is shared at:

Fight Back Friday, Fresh Bites Friday, Make Ahead Monday, Tasty Tuesday, Slightly Indulgent Tuesday, Gluten Free Wednesdays

Pumpkin Pecan Pie Muffins

Pumpkin Pecan Pie Muffins

Fall is my favorite time of year.  I love the bright colors outside when the leaves begin to change, the warm smells in the kitchen of seasonal vegetables roasting and the crisp feeling of the chilly air when taking the dog for a walk in the afternoon sunshine…oh and November is my birthday month (only child syndrome!).  Growing up everyone in my family loved Pumpkin Pie with Cool Whip at Thanksgiving…not me, I was a Pecan Pie and vanilla ice cream girl.  My taste for all things pumpkin didn’t develop until later in life but now I simply cannot get enough of it…pumpkin pancakes, pumpkin bread, pumpkin cookies, pumpkin muffins, pumpkin pie…the list is practically endless.  Several years ago I found a recipe for the ultimate Thanksgiving dessert, Pumpkin Pecan Pie…it’s my new favorite but since following a paleo/primal diet I haven’t tried to adapt the recipe yet (don’t worry, the recipe WILL be adapted and posted before Thanksgiving this year!).  I started my fall baking this season with these wonderful Pumpkin Pecan Pie Muffins…they are fruit sweetened, dairy free and great for breakfast, snack and even dessert!

Pumpkin Pecan Pie Muffins

Makes about 24 muffins

2 large ripe bananas

1/2 cup medjool dates, pitted and soaked (about 6-8 dates)

5 eggs

1/2 cup pumpkin puree (canned or fresh roasted)

1 teaspoon vanilla extract

1/4 cup coconut oil, melted

1 /2 cup coconut flour

1/4 cup ground flax seeds

1 teaspoon baking soda

1/4 teaspoon salt

1 Tbsp pumpkin pie spice (or more/less according to your taste)

1/2 cup of pecans, chopped

24 pecan halves (optional, for topping)

  1. Preheat oven to 350 degrees F.  Line muffin tins with paper liners or grease well with coconut oil.
  2. Place pitted dates in a bowl, cover with very hot water and soak for about 10 minutes, drain well after soaking.
  3. To a blender add bananas, pumpkin, dates, vanilla, eggs, and melted coconut oil.  Puree until smooth.
  4. Sift all dry ingredients together in a separate bowl.
  5. Add wet ingredients to the dry and stir until there are no lumps.
  6. Stir in chopped pecans.
  7. Divide evenly between the muffin cups (I use an ice cream scoop which is about 1/4 cup of batter).
  8. Place one pecan half on top of each muffin.
  9.  Bake for 22 to 25 minutes or until a toothpick comes out clean.
  10. Let cool completely on rack before serving.

Recipe Tips…

  • If you don’t have pumpkin pie spice add: 2 tsp. cinnamon, 1/2 tsp ginger, 1/4 tsp nutmeg, 1/4 tsp cloves instead
  • You could omit the coconut oil and add and extra 1/4 cup of pumpkin
  • Make these an even more decadent dessert by adding 1/2 cup 70% (or greater) dark chocolate chips or cacao nibs for a completely sugar-free recipe
  • Top with a dollop of whipped coconut cream or if you tolerate dairy a dollop of fresh whipped cream

Enjoy the taste of pumpkin pecan pie everyday, guilt-free!

This recipe is shared at:

Fight Back Friday

Fat Tuesday, Slightly Indulgent Tuesday, Tasty Tuesday

Gluten-Free Wednesdays, This Chick Cooks

Proceed with Extreme Caution…Fudgy Brownies Ahead!

Oh my. Glad I start on the Whole 30 on Monday…these will be gone by then!

Fudgy Brownies with Chopped Macadamia Nuts

Megan Keatley at Health-Bent  posted a recipe earlier this year for Paleo Fudgy Brownies and I have been dying to make them!  It was a beautiful fall Colorado day and it just seemed like the perfect time to bake…these were so easy to make and they turned out so yummy!  I made a few adjustments to the recipe which I am posting here, visit Health-Bent (Paleo friendly recipes that don’t look or taste like dog food!) for the original recipe and be sure to take a look at their other mouth-watering recipes as well!

Fudgy Macadamia Nut Brownies

1/2 cup almond butter

1/2 cup sunbutter

1/2 cup canned coconut milk

2 pastured eggs

1 Tbsp vanilla

1/4 tsp. celtic sea salt

1/3 cup raw cacao

1/4 cup pitted medjool dates, packed

1/3 cup chocolate chips (70% or greater)

1/3 cup macadamia nuts, chopped and divided

Preheat oven to 350 degrees F. Grease an 11 x 7 Pyrex dish (an 8 x 8 would work also).  Place pitted dates in a small bowl and cover with very hot water and set aside for at least 10 minutes.  In a medium bowl whisk together almond butter, sunbutter, coconut milk, eggs and vanilla.  Drain dates and process in a food processor or high-speed blender until smooth, whisk into the wet mixture.  Mix in salt and cacao powder and stir until smooth.  Add chocolate chips and half of the chopped macadamia nuts, mix until incorporated.  Pour batter into the prepared dish and sprinkle remaining nuts on top of the batter.  Bake for 18 – 20 minutes, top will start to slightly crack around the edges when the brownies are done, cool completely on a wire rack before cutting.

Recipe tips:

  • I think these taste best after resting for several hours and even better out of the fridge!
  • You could substitute 1 cup of any nut butter for the almond/sun butter combo
  • 1/4 cup of any sweetener could be used in place of the dates (palm sugar works great!)
  • If you prefer dairy, sub 2 Tbsp. melted butter and 1/4 cup + 2 Tbsp. heavy cream for the coconut milk
  • To make the entire recipe sugar-free, use 1/4 cup cacao nibs in place of the chocolate chips, this will give the brownies a nice crunch but they won’t have the added sweetness from the sugar in the chocolate chips so you might want to add 1 ripe banana.

Cooling...notice the slight cracks around the edges...try to avoid digging directly into the pan with a spoon!

This recipe is shared at:

Slightly Indulgent Tuesday, Fat Tuesday & Tasty Tuesday

Gluten-Free Wednesdays

Fight Back Fridays

Chocolate Macadamia Nut Butter Cups

I grew up eating Reese’s Peanut Butter Cups…I loved them, especially when they came out with the Reese’s Miniatures…those babies were so fun (and easy!) to eat.  I still crave peanut butter and chocolate…probably more often than I should but now I have found a lovely little alternative that satisfies my craving and nourishes my body all at the same time.  In this recipe I used almond butter and macadamia nuts but you could easily substitute any nut butter or nut that you like in their place.  Enjoy!

Chocolate Macadamia Nut Butter Cups

 Chocolate Macadamia Nut Butter Cups

24 whole raw macadamia nuts

6 Tbsp shredded coconut

6 Tbsp raw cacao powder

6 Tbsp coconut oil, melted

6 oz coconut butter or manna, softened

Pinch of Celtic sea salt

1/2 tsp vanilla or almond extract

1/4 – 1/2 tsp liquid stevia (optional)

2 Tbsp almond butter

24 mini cupcake liners

Line a mini muffin pan with the 24 cupcake liners.  In a medium bowl combine coconut, coconut oil, cacao powder, coconut butter, salt, vanilla and stevia (if using).  Stir ingredients until thoroughly combined.  Spoon the mixture into the paper liners evenly.  Using a small spoon place a 1/4 tsp dollop of almond butter on top of each candy, place the macadamia nut on top of the almond butter and press the nut lightly down into the cup.  Put the muffin pan into the refrigerator to chill the candies, about 30 minutes.  Keep refrigerated in an airtight container until ready to serve.

Taste just like a Reese's to me...

This recipe is shared at:

Slightly Indulgent Tuesday & Tasty Tuesday

Gluten-Free Wednesdays & Wellness Weekend

Almond Joy Freezer Pie

Almond Joy Freezer Pie (shown using mini cheesecake pan)

This Almond Joy Freezer Pie has been my go to dessert this summer!  It’s cool, refreshing and decadent…not to mention SO easy to make!  I have literally had some form of this dessert in my freezer all summer long…I’ve made it in a pie plate, mini-cheesecake pans, a springform pan and a 9×9 brownie pan…they are all great but the individual tarts are my favorite.  It is so nice to always have a pretty dessert on hand for when you have company drop by or for that late night chocolate craving too!   This dessert is fruit sweetened, that’s right…no extra sweetener has been added to the recipe other than fruit…that makes this a superstar dessert in my book!  I chose to make this an Almond Joy Pie, you could easily turn it into a scrumptious Peanut Butter Cup Pie by substituting chopped peanuts for the almonds in the topping and adding 1/4 cup peanut butter and omitting the almond extract in the filling


For the crust:

3/4 cup almond flour

3/4 cup unsweetened shredded coconut, lightly toasted

1/4 tsp. celtic sea salt

1/4 cup coconut oil, melted over low heat

1 Tbsp. coconut palm sugar (optional for a slightly sweeter crust)

2 tsp. organic vanilla

In a large bowl combine almond flour, toasted coconut and salt.  Whisk together coconut oil, palm sugar (if using) and vanilla.  Add wet ingredients to the dry ingredients and thoroughly combine.  Press mixture into desired dessert dish (9″ pie plate, mini cheesecake pans, springform pan or square 9×9 dish).  Bake at 350 F for 10-12 minutes or until golden brown.  Cool completely on a wire rack.

For the filling:

5 small ripe bananas, peeled and broken into small pieces (about 14-16 ounces peeled)

1 cup organic coconut milk, canned

1/4 cup unsweetened cacao powder (or your favorite unsweetened cocoa powder)

1 tsp vanilla extract

1/2 tsp almond extract

Combine all ingredients in blender or food processor and blend until very smooth, about 3 minutes on high-speed.  Check to make sure all the banana is pureed before filling the crust.  Pour filling into your cooled crust and sprinkle toppings (listed below) across the top of the filling.  Wrap tightly with plastic wrap and freeze for at least 4 hours, or overnight.

For the topping:

1/2 cup sliced almonds, lightly toasted

1/4 cup unsweetened coconut flakes

1-2 oz. finely chopped or shaved dark chocolate (I use 70% or higher)

Set the dessert at room temperature about 20 minutes before serving, cut with a sharp knife, ENJOY!

This recipe is shared at:

Slightly Indulgent Tuesday , Tasty Tuesday & Traditional Tuesdays

Gluten-Free WednesdaysThis Chick Cooks & Foodie Wednesday

Pennywise Platter Thursday, Fresh Bites Friday

Wellness Weekend & Fight Back Friday


Almond Butter Coconut Bites

These Almond Butter Coconut Bites are the perfect little “primal” treat.  They will satisfy any sweet tooth with just one (ok, maybe two) bites!  Again, these are easy to customize to your own taste…substitute your favorite nut or seed butter for the almond butter and any sweetener for the coconut nectar…and go crazy on the toppings too!

Almond Butter Coconut Bites:

Almond Butter Coconut Bites

1/4 cup coconut oil (softened)

1/3 cup almond butter

2 tsp. coconut nectar

3 Tbsp. shredded coconut

1/2 oz. dark chocolate, grated

sea salt

Mix coconut oil, almond butter, 2 Tbsp. coconut and coconut nectar together in a bowl.  Spread onto a small parchment lined pan (see note below), sprinkle with a dash of sea salt, the grated dark chocolate and 1 Tbsp. of shredded coconut. Freeze for one hour and then cut into 12 small squares.  Serve immediately or store in an airtight container in the freezer.

**I live in Colorado and do not have air conditioner in my home so my mixture was very runny and there was NO way I could spread and shape this mixture on any kind of pan with out sides so I opted to use a nut butter cup candy mold…worked like a charm!  A small casserole dish would probably work nicely as well…

This Recipe is shared at:

Slightly Indulgent Tuesdays & Tasty Tuesdays

Almond Coconut Delight Cookies

Today I was in the mood for something sweet, chewy and warm…only a cookie was going to satisfy my craving. I didn’t want anything too rich or chocolately but more along the oatmeal raisin type of cookie…I don’t eat oats anymore so that chewy texture is sometimes a challenge to achieve in a cookie but this recipe does the trick perfectly!

These cookies are so easy to make and you can adapt them to your liking very easily.  I used coconut oil and coconut nectar but you could use any oil (or even butter) for the fat and agave, honey or yacon syrup could be used for the sweetener.  Walnuts and raisins are always my choice for nuts and dried fruit but again you can substitute your favorites without any problems…

Almond Coconut Delight Cookies

Coconut Delight Cookies

Makes about 16 cookies

Ingredients:

1/4 cup coconut oil (or oil of your choice)

1/4 cup coconut nectar (or agave, honey, palm sugar or yacon)

1 tsp. vanilla

1 1/4 cup almond flour

1/4 tsp. sea salt

1/4 tsp. baking soda

1/2 cup chopped nuts (I used walnuts)

1/2 cup shredded coconut, unsweetened

1/4 cup dried fruit (raisins or cranberries) or dark chocolate chips

Preheat oven to 350 F.  In a large bowl combine oil, sweetener and vanilla, set aside.  In a medium bowl combine almond flour, salt, baking soda, nuts, coconut and dried fruit or chocolate chips.  Add dry ingredients to wet ingredients and mix throughly.  Drop by rounded tablespoon onto a parchment lined cookie sheet and slightly flatten.  Bake for 8-10 minutes or until golden brown around the edges.  Cool on a wire rack and serve.

Try to eat just one...

This recipe is shared at:

Slightly Indulgent Tuesdays & Tasty Tuesday

Gluten-Free Wednesdays

Banana Muffins and Mini-Cakes

Banana Mini-Cakes with Chocolate Chips

Hello, my name is Andrea and I am a sugar addict.

It has taken me several years of intense struggle to finally admit that I have a real problem with sugar.  I stopped eating all kinds of refined sugars about 4 years ago (along with gluten and soy) but I have intermittently experimented with agave nectar, maple syrup, honey and more recently coconut sugar.  You see, I love dessert and really felt like I couldn’t live without it…so I adapted every recipe I craved into a “healthier” version using natural sugar substitutes.

However, as I am living a “cleaner” primal lifestyle these days, no gluten, soy, refined sugar or grains I find that even the “natural” sugars sometimes bother me.  And when I say bother what I really mean is that they tend to make me a wee bit of a crazy person!!!!  It’s like a drug to me as it is for many people.  My saving grace is that my will power (I like to use that term way better than saying my obsessive-compulsive tendency) doesn’t allow me to over-indulge in the desserts I make, I only experience the mental torture…

Whew, now that I’m past the denial stage…I will admit that I still like to enjoy sweet treats on occasion which has led me to seek out desserts and baked goods that are fruit or stevia sweetened.  I visit the blog What I Crave regularly and to my delight found a recipe for Date Sweetened Banana Bread.  I made this recipe into muffins and a few heart-shaped mini-cakes (with mini chocolate chips added).  These muffins have the perfect texture and sweetness, they are wonderful with a pat of homemade butter or a schmear of cream cheese.  I like to have them for breakfast or as an afternoon snack with a nice cup of coffee or tea.

Muffins and Mini-Cakes

Date Sweetened Banana Muffins

Makes 18-24 muffins

3 ripe bananas

1/2 cup medjool dates, pitted (5 – 6 dates)

5 eggs

1/2 cup butter or coconut oil, melted

1 /2 cup coconut flour

1/4 cup ground flax seeds

1 teaspoon baking soda

1/4 teaspoon salt

1 teaspoon cinnamon

pinch of nutmeg

1/2 cup of pecans or walnuts, chopped

1/2 cup mini chocolate chips (optional)

  1. Preheat oven to 325 degrees F.  Line muffin tins with paper liners
  2. To a blender add two peeled bananas, pitted dates, eggs, and melted butter or coconut oil.  Puree until smooth.
  3. Sift all dry ingredients together in a separate bowl.
  4. Add wet ingredients to the dry and stir until there are no lumps.
  5. Chop the remaining banana and add to batter along with the nuts and chocolate chips (if using).
  6. Divide evenly between the muffin cups (I use an ice cream scoop which is about 1/4 cup of batter).
  7.  Bake for 22 to 25 minutes or until a toothpick comes out clean.
  8. Let cool completely on rack before serving.

Banana Muffins

Enjoy this wonderful recipe and check back often for more “sugar-free” treat recipes. 

 Remember…Life is too short to not have dessert!

This recipe is shared at:

Slightly Indulgent Tuesday,  Tasty Tuesday & Tempt My Tummy Tuesday

Gluten-Free Wednesdays