Gluten-Free Oatmeal Chocolate Chip Muffins

IMG_1897

Perfect for a healthy breakfast on the run…

Who doesn’t love a healthy grab-n-go breakfast?
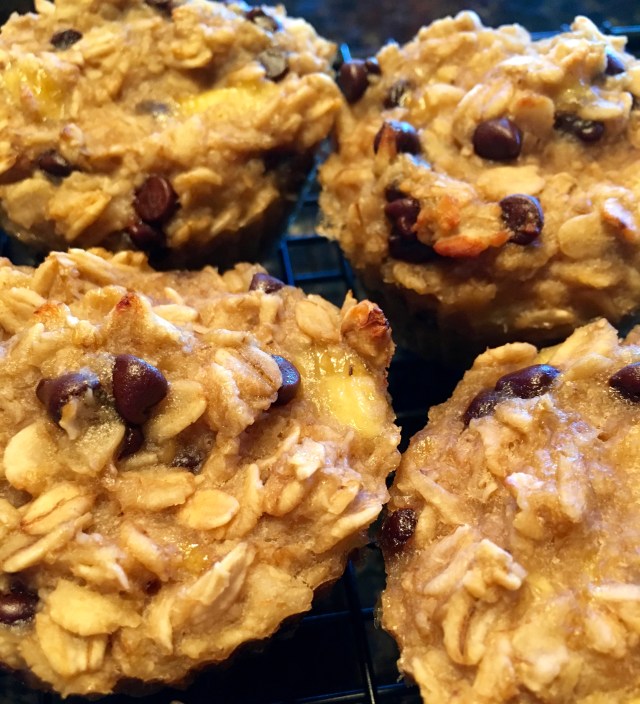
This is a super easy make ahead recipe that is perfect for those mornings when you are racing out the door but don’t want to skip a healthy breakfast. One or two of these muffins heated in the microwave and you’ve got a tummy-warming oatmeal breakfast without the mess! Feel free to customize these to your liking, sub out the chocolate chips for raisins or dried cranberries, add a dash of cinnamon or use pumpkin in place of the banana…the options are endless.

Oatmeal Chocolate Chip Muffins

Ingredients (for 24 muffins):

5 cups gluten-free rolled oats (I used Bob’s Red Mill)

1 tsp. salt

2/3 cup mini chocolate chips

2 1/2 cups mashed ripe bananas

5 Tbsp. honey or maple syrup

2 1/3 cup water

5 Tbsp. coconut oil, melted

2 1/2 tsp. vanilla extract

Instructions:

Preheat oven to 375º F. Line 24 muffin cups with silicone liners.

In a large mixing bowl, combine oats, salt and mini chocolate chips. In a separate bowl whisk together mashed banana, sweetener, water, oil and vanilla. Mix wet ingredients into dry ingredients, combine thoroughly. Divide evenly into muffin cups. These don’t rise so a heaping 1/4 cup of batter is enough to fill the muffin cup without running over.

Bake for 20 minutes, rotating pans 180º after 10 minutes. Remove from oven and cool on wire racks. Freeze in airtight container or plastic freezer bags.

IMG_1899

Italian Bacon~Spinach~Tomato Mini Frittatas

This a simple recipe that uses fresh and flavorful ingredients and it’s easy to put together.  I used raw milk cheese in mine but if you are dairy-free you can simply leave it out.  Enjoy this high protein, low carb dish for breakfast, lunch or dinner with a nice side salad or even some oven-roasted sweet potatoes.

Pastured eggs, nitrate-free bacon, vine ripe tomatoes, baby spinach and raw milk cheese…beautiful!

Italian Bacon~Spinach~Tomato Mini Frittatas

This recipe makes two servings (the photo above was for one).

Ingredients:

4 pastured eggs

4 strips bacon, cooked and crumbled

2 ounces mozzarella cheese, shredded

2 large tomatoes, sliced thin and seeded

1 ounce baby spinach

2 tsp. grated Parmesan cheese

2 tsp. Italian seasoning

salt and pepper

Directions:

Preheat oven to 350 degrees F.  Grease 4 ramekins or 2 individual size serving dishes, set aside.

In a small bowl whisk together eggs and Italian seasoning.

In each dish layer tomatoes, spinach, cheese and bacon…depending on the size of your dish you should have enough room to repeat the layers.

Pour the whisked eggs over the layered ingredients evenly (about 1/4 cup in each ramekin).

Sprinkle with 1/2 tsp. Parmesan cheese.

Bake for 20-25 minutes or until the eggs are set.

Baked to perfection!

You can pop these easily out of the ramekins or serve them directly in the baking dish.  Either way…Delish!

This recipe is shared at:

Fill Those Jars Fridays, Fresh Bites Fridays, Slightly Indulgent Tuesday, Fat Tuesday, Gluten-Free Wednesdays, Whole Foods Wednesdays, Made From Scratch Mondays

Grain-Free Cinnamon Coffee Cake with Maple Drizzle

Grain-Free Coffee Cake with Maple Drizzle

Breakfast is the most important meal of the day for me…no matter what time of day I eat it.  I generally like to have bacon and eggs, omelets, frittatas or sometimes even coconut pancakes but every once in a while on the weekends or for holidays a nice sweet treat served with homemade spicy sausage is where it is at!  This recipe is adapted from one in Elana Amsterdam’s Gluten-Free Almond Flour Cookbook and is truly the best gluten-free, grain-free, refined sugar-free coffee cake I’ve ever eaten…as a matter of fact it is better than any coffee cake I’ve ever had that was full of sugar, gluten and grain!!!

This past Friday was my mom’s birthday followed by Mother’s Day on Sunday so I thought I’d treat my mom, dad and husband (and let’s be honest…ME, too) to a fun, decadent breakfast dessert…and it really hit the spot!

Out of the oven…resting.

Grain-Free Cinnamon Coffee Cake (makes 9-12 servings):

2 1/2 cups blanched almond flour
1/4 tsp sea salt
1/2 tsp baking soda
1/2 cup pecans, coarsely chopped
1/2 cup raisins
1/4 cup butter or coconut oil, melted
1/4 cup maple syrup
2 large eggs
1 tsp. vanilla

Topping:
3 Tbsp. ground cinnamon
3 Tbsp. butter or coconut oil, melted
6 Tbsp. maple syrup
1/2 cup sliced almonds or chopped pecans

Preheat the oven to 350 degrees F. Grease an 8-inch square baking dish or pan with butter or coconut oil and lightly dust with almond flour.

To make the cake:

Combine the almond flour, salt, baking soda, pecans and raisins in a large bowl.  In a medium bowl, whisk together the melted butter or coconut oil, maple syrup, eggs and vanilla.  Make a well inside the dry ingredients and pour the wet ingredients into the well.  Stir the wet ingredients into the dry ingredients until thoroughly combined, the batter will be very thick.  Scrape the batter into the prepared baking dish. Using a spatula, gently push the batter into place making it as level as possible.

To make the topping:

Combine cinnamon, butter or coconut oil, maple syrup and pecans or almonds in a bowl.  Spread the topping over the cake batter. 

Bake for 25-35 minutes, until a toothpick inserted into the center of the cake comes out clean. Let the cake cool in the pan for 1 hour on a wire rack.  Slice cake into squares and drizzle with Maple Frosting before serving.

This cake can be stored in an airtight container at room temperature for several days.  Once you drizzle it, store it in the fridge.

Maple Drizzle:

3/4 cup coconut butter

1/4 cup pure maple syrup (or more to taste)

1/4-1/2 cup heavy whipping cream, almond milk, or coconut milk

pinch of salt

In a small saucepan, heat all ingredients over medium-low heat, stir until well combined.  Consistency should be thin enough to drizzle over the coffee cake.

***If you eat dairy and prefer a maple cream cheese drizzle…substitute 4 ounces softened cream cheese for the coconut butter and reduce the heavy cream to 2 Tbsp.-1/4 cup and blend in a small bowl with a hand mixer until smooth.  Again the consistency should be thin enough to drizzle***

This coffee cake is delightful with or without the drizzle.

This recipe is shared at: Slightly Indulgent Tuesday, Tasty Tuesday, Tasty Tuesday, Gluten-Free Wednesdays, Whole Foods Wednesdays, Fight Back Friday, Beyond the Peel

No drizzle necessary for complete yummi-ness!

But then again…why not just go for it!

Banana Walnut Pancakes

Banana Walnut Pancakes with Maple Syrup

Sometimes you just gotta have pancakes.

Well, I do anyways.  I’m sure I’ve mentioned before that breakfast is my favorite meal of the day…no matter what time I eat it!  I don’t make pancakes all that often, usually only for a special occasion breakfast (think…birthday or holiday) but tonight I just felt like having a comforting meal.  Shannon at Nourishing Days has created the absolute best recipe for Fluffy Coconut Flour Pancakes I’ve ever tried…I’ve made this recipe dozens of times using both coconut milk and heavy cream and they always turn out great!  Below I’ve posted the recipe I use regularly, which is her original recipe halved with a touch of cinnamon added.  If you do have leftovers they freeze well.  My favorite topping for pancakes or waffles will always be maple syrup, bananas and walnuts, I rarely stray from that combo but you could top your pancakes with anything you like…or they are even great with just a dollop of butter or drizzle of coconut butter!

 Coconut Flour Pancakes (makes 6-8 pancakes)

2 eggs

1/2 cup coconut milk or heavy cream

1/2 Tbsp. coconut nectar or honey (optional)

1/2 Tbsp. vanilla

1/4 cup coconut flour

1/2 tsp. cinnamon

1/2 tsp. baking soda

1/4 tsp. sea salt

coconut oil or butter for the pan

  1. Preheat griddle over medium-low heat. In a small bowl beat eggs until frothy, about two minutes. Mix in milk, vanilla, and sweetener.
  2. In a medium-sized bowl combine coconut flour, baking soda, cinnamon and sea salt and whisk together. Stir wet mixture into dry until coconut flour is incorporated.
  3. Grease pan with butter or coconut oil. Ladle a few tablespoons of batter into pan for each pancake. Spread out slightly with the back of a spoon. The pancakes should be 2-3 inches in diameter and fairly thick. Cook for a few minutes on each side, until the tops dry out slightly and the bottoms start to brown. Flip and cook an additional 2-3 minutes.
  4. Serve hot with butter, coconut oil, honey, syrup, or fruit.

This recipe is shared at:

Gluten-Free Wednesdays, Fat Tuesday, Slightly Indulgent Tuesday, Tasty Tuesday, Fight Back Friday

Green Chile Chicken Fajita Frittata

A Frittata by definition is an egg based dish similar to an omelette or Quiche, enriched with additional ingredients such as meats, cheeses, vegetables and pastas.  It may also be flavored with herbs.  Unlike an omelette, which is traditionally made to order for one, a frittata can be made in a larger pan, sliced and served family style.  Frittatas are extremely versatile, they are classically made for breakfast or brunch but are also great for a light supper.  I like my frittatas hot, however they are great at room temperature or even cold out of the refrigerator.  The possibilities are endless for ingredients and flavors…

Green Chile Chicken Frittata with Avocado Slices

Green Chile Chicken Fajita Frittata (serves 2 generously)

4 eggs

1 Tablespoon water

1/4 teaspoon chili powder

1/8 teaspoon salt

pinch of black pepper

1 – 4 oz can green chiles

1/2 cup chopped onion

1/2 cup chopped red pepper

4 medium mushrooms, diced

1 teaspoon minced garlic

4 ounces cooked chicken (breast, thigh or rotisserie)

Butter, coconut oil or lard

Sliced avocado, salsa and chopped cilantro for garnish

Preheat broiler.  Whisk eggs, water, chili powder, salt, pepper and green chiles in a medium bowl until frothy and set aside.  In a 10″ oven safe skillet melt fat over medium heat, add onions, peppers, mushrooms and garlic, cook until vegetables are soft.  Add chicken and stir to combine with vegetables.  Lower heat to medium-low.  Pour egg mixture evenly over chicken and vegetables.  Cook the frittata slowly until the eggs are set almost all the way through.  Shake the pan occasionally during cooking to ensure the frittata isn’t sticking to the bottom.  Place the pan under the broiler for 3 – 5 minutes to set the top of the frittata completely.  Remove from oven and let rest for 10 minutes before removing from the pan.  Slice and serve warm or at room temperature.  Garnish with avocado, salsa and chopped cilantro.

This recipe is shared at:

Fight Back Friday, Allergy Friendly Lunchbox Love, Make Ahead Monday, Tasty Tuesday, Slightly Indulgent Tuesday, Fat Tuesday, Gluten-Free Wednesdays

Warm Pear & Pecan Flaugnarde

Flaugnarde is a flan-like baked French dessert with fruit arranged in a buttered dish and covered with a thick flan-like batter.  Similar to a clafoutis which is made with black cherries, a flaugnarde is made with apples, peaches, pears, plums, prunes or other fruits. Resembling a large pancake, the dish can be served either warm or cold.

Pear & Pecan Flaugnarde

Most people think of this dish as a dessert but it can easily be enjoyed for breakfast as well!  This recipe uses heavy cream and butter but if you prefer a dairy-free dish substitute 3/4 cup full fat canned coconut milk for the cream and butter and use coconut oil to grease the dish.  I have made it both ways and they are equally delicious.  You will notice there is an option to add sweetener, I try to use the ripest, sweetest seasonal fruit available so I generally don’t need the added stevia or honey.  Please note…since completing the Whole 30 program I find that I don’t like anything too sweet anymore so be sure to adjust according to your family’s taste.  This is lovely topped with fresh whipped cream or drizzled with coconut butter when enjoying it for dessert or with a nice side of bacon or sausage at breakfast!

Pear & Pecan Flaugnarde (serves 8)

Ingredients:

butter for greasing baking dish

4 eggs

1/2 cup heavy cream

4 tablespoons butter, melted

1/4 cup pecan halves, finely ground

1 teaspoon vanilla extract

1 teaspoon cinnamon, divided

1/4 teaspoon stevia or 1/4 cup coconut sugar or honey (optional, I don’t use any sweetener)

1/4 teaspoon celtic sea salt

3 medium ripe pears, peeled, cored and sliced thin

2 tablespoons chopped pecans

Directions:

Preheat oven to 375 degrees F.  Generously grease a 9 inch pie or tart dish, ceramic works best, set aside.  Peel, core and slice pears.  Arrange pears in the greased dish and sprinkle with 1/2 teaspoon cinnamon.  In a blender or food processor combine eggs, cream, butter, ground pecans, vanilla, remaining cinnamon, sweetener (if using) and sea salt.  Blend or process until smooth, batter will be thin.  Pour batter evenly over the arranged pears, sprinkle with chopped pecans.  Bake for 40-50 minutes until golden brown, puffed and set in the middle.  Cool for at least 30 minutes before serving.

Arranged pears in greased tart dish

This recipe is shared at:

Fight Back Friday, Make Ahead Monday, Slightly Indulgent Tuesday, Fat Tuesday, Gluten-Free Wednesday

Proscuitto and Spinach Egg Cups

Prosciutto and Spinach Egg Cups

Prosciutto egg cups are an easy grab and go breakfast idea or a lovely main dish served alongside a green salad for a light lunch.  They are easily adaptable to your family’s preferences for veggies and you can certainly add cheese to the mix if you include dairy in your diet.  I like to bake up a batch of these and freeze them for travel…they give me plenty of protein when I’m on the go and I can even enjoy them at room temperature when I’m on the airplane.

Now, you will notice that this recipe uses a combination of whole eggs and egg whites (gasp!)…please don’t misunderstand me here…I LOVE whole eggs and wholeheartedly believe in eating egg yolks but sometimes I like a little bit of a lighter egg dish and I find that this combination works well for me.  If you prefer to use whole eggs for the entire recipe…go for it…or you can always save the egg yolks and make some Caramelized Banana Dairy-Free Ice Cream!!

Prosciutto and Spinach Egg Cups

Serves 4 (2 egg cups each)

4 eggs

1 cup egg whites

12 slices prosciutto, cut in half

1/2 onion, chopped

8 medium mushrooms, chopped

8 ounces baby spinach

salt and pepper to taste

oil or butter for sauteing veggies and greasing ramekins

Preheat oven to 400 degrees F.  Grease bottom and sides of eight ramekins.  Line each ramekin with prosciutto (mine took 1.5 pieces to completely cover each one) and set aside.  In a bowl, whisk together eggs, egg whites, salt and pepper until frothy, set aside.

In a large skillet, heat butter or oil and saute onions and mushrooms until tender.  Add the spinach and stir until just wilted making sure the veggies are all mixed together. Add a pinch of salt and some pepper, if desired.  Divide the veggie mixture evenly  into the ramekins and press down so that they are tightly pressed in the ramekin.  Divide whisked eggs evenly into the ramekins (I found that each one holds about 6 Tbsp of egg mixture).  Place all of the ramekins on a cookie sheet and bake in the oven for 20 minutes or until eggs are set in the middle.  Remove from oven and let rest for 5 minutes.  Pop the egg cups out of the ramekin and enjoy!

Recipe Variations:

  • onion, broccoli and red pepper
  • asparagus, garlic and shallots
  • zucchini, purple onion and tomato
  • 4 ounces Gruyère or Swiss cheese added to the egg mixture
  • 1 Tbsp. Italian or Adobo seasoning added to the whisked eggs

This recipe is shared at:

Make Ahead Monday, Fat Tuesday, Tasty Tuesday, Tempt My Tummy Tuesdays, Slightly Indulgent Tuesday

Gluten Free Wednesdays, Fight Back Friday

The Perfect Paleo Biscuit…

Light and Fluffy

I don’t know about you but I’ve always been terrified of making biscuits.  There is always so many steps and requirements no matter what recipe you choose…cold butter, floured board, fold the dough but don’t handle it too much, rolling, patting, cutting, resting…yikes, too much room for error for me.  So, when we were a wheat (and processed food) eating family I would just pop open one of those cans of ready-to-cook flaky buttermilk biscuits…hard to mess them up unless you forgot to set the oven timer!  I’ve seen many gluten or grain-free biscuit recipes over the years but that fear of the whole “biscuit making process” has kept me from trying any of them out…until this week.  To my surprise, they are so easy!  This recipe uses just 6 ingredients and you literally only have a few steps to follow.  These biscuits make a great addition to any meal and they are wonderful for making quick and easy breakfast sandwiches.  I’ve made them several times now and they have turned out perfectly each time!

Ham, Avocado and Egg Breakfast Sandwich

The Perfect Paleo Biscuit

Makes 9 biscuits

6 egg whites

3/4 cup blanched almond flour

1/4 cup coconut flour

1 teaspoon baking powder

1/4 teaspoon salt

1 1/2 tablespoons coconut oil, chilled

Preheat oven to 400 degrees.  Line a baking sheet with parchment paper.  Mix almond flour, coconut flour, baking powder and salt together in a large mixing bowl.  Cut in cold coconut oil with a fork until the mixture is crumbly.  Place the bowl in the refrigerator for 10 minutes.  In a medium bowl whisk egg whites until they are very frothy.  Fold the egg whites into the chilled flour mixture until well combined.  Scoop about 1/4 cup of dough onto the baking sheet and smooth the top to form each biscuits, an ice cream scoop works well in this step.  Bake for 15-18 minutes, or until the tops are golden brown.  Serve warm or store in an airtight container in the refrigerator.

Ready for the oven...

This recipe is shared at:

Fight Back Friday, Slightly Indulgent Tuesdays, Fat Tuesday, Tasty Tuesday

Jicama and Sausage Breakfast Pie

Check out that jicama crust!

Everyone says that breakfast is the most important meal of the day…I don’t know whether or not that’s true but I DO know it’s my favorite meal of the day…even if I’m eating it at 6 o’clock in the evening!  Since starting the Whole 30 Program I’ve been dairy-free which really made it difficult to navigate most of my previous breakfast go-to recipes which usually contained some sort of dairy (cream, butter, raw milk cheese, Parmesan…).  Oh sure, I was able to adapt my omelets and frittatas easy enough but some of my favorite breakfast casseroles just don’t work without the dairy!   This recipe is an adaptation of Jan’s Sushi Bar’s Sausage Mushroom Breakfast Casserole, her recipe calls for sweet potatoes as the crust, which is absolutely wonderful, I just prefer a lower carb/glycemic breakfast (and one that I can eat everyday).  I have often used jicama as a substitution for potatoes in latkes or hash browns and it worked beautifully in this recipe as well.  This is a really hearty, filling dish that would be great for any meal of the day and it keeps well for leftovers, too.  Now, I will say that this recipe is a bit labor intensive, nothing difficult, just a lot of steps…you won’t be disappointed though, it’s totally worth it!  I know that in these pictures it looks like I’ve loaded the casserole up with lots of gooey cheddar cheese but the bright yellow color is actually from my pastured eggs from Larga Vista Ranch, the yolks are always SO yellow!

Layers of yummy goodness!

Jicama and Sausage Breakfast Pie

serves 4

12-14 ounce jicama (weight is before peeling and shredding)
8 ounces ground pork, seasoned** (or your favorite breakfast sausage)
4 ounces white mushrooms, sliced
1  tablespoon coconut oil, divided
1/2 medium roasted red bell pepper, peeled, seeded and chopped (I used Mediterranean Organic jarred peppers)
1/4 large onion, diced
6 eggs
3 ounces coconut milk (1/4 cup + 2 tablespoons)
2 teaspoons kosher salt, divided
1/2 teaspoon freshly ground black pepper, divided

Preheat the oven to 375 F. Grease a glass pie pan or an 8×8 Pyrex dish with 1/2 tablespoon of the coconut oil.

Peel the jicama and run it through the shredder disc of your food processor, or shred it using the large holes of a box grater. Place the shredded jicama in a large bowl and generously sprinkle with 1 teaspoon salt, stir and then set aside.

Crumble the sausage into a large, heavy skillet and cook over medium-high heat until no longer pink. Remove with a slotted spoon to a medium bowl and set aside.

Without draining the fat, reduce the heat slightly and add the mushrooms in a single layer to the skillet. Don’t crowd them – you want them nicely browned and almost crisp.  Too many in the pan at once will cause them to steam, rather than brown, once they begin to give off moisture. Cook them in batches if necessary. Once they are nicely browned, remove with a slotted spoon and add them to the sausage.  (I know you may want to just throw them all in the pan and be done with it but this step is important…the crispy mushrooms add a lovely texture to the casserole…don’t skip it!)

Add 1/2 tablespoon of the coconut oil to the skillet and reduce the heat to medium-low. Cook the onions until soft and golden, about 5 minutes. Remove with a slotted spoon, and add to the bowl with the sausage and mushrooms.

Lightly toss the roasted, chopped bell pepper with the sausage, mushrooms and onions. Set aside.

Pour the shredded jicama into a colander lined with a kitchen towel and squeeze as much liquid out as possible.  Return them to a dry bowl and toss them with 1/2 teaspoon of salt and 1/4 teaspoon of pepper, then spread them over the bottom and sides of the greased baking dish (just the bottom if using an 8×8 dish). Sprinkle the sausage/mushroom mixture evenly over the jicama, covering it as completely as possible.

In a large bowl, whisk the eggs and coconut milk together with the remaining 1/2 teaspoon of salt and 1/4 teaspoon of pepper until well-blended. Pour the egg mixture over the sausage and jicama in the baking dish, making sure the eggs are distributed evenly.

Cover the dish with foil and bake for 35-40 minutes, until the eggs are set and a knife inserted in the center comes out clean. Remove the foil and return to the oven for another 10-15 minutes to brown the top. Allow to rest for 10 minutes; cut into 4 equal portions and serve.

**I use fresh ground pork and season it to my liking for breakfast sausage rather than buying pre-made breakfast sausage because most of them contain some sort of sweetener…

Here is what I use for 8 ounces of ground pork:

1/2 teaspoon celtic sea salt

1/2 teaspoon white pepper

1 teaspoon ground sage

1/2 teaspoon dried thyme

1/4 teaspoon dried rosemary

1/4 teaspoon cayenne

1/4 teaspoon crushed red pepper flakes

1/8 teaspoon ground nutmeg

Voila! Dairy-Free Breakfast Pie!

This recipe is shared at:

Fight Back Friday, Fresh Bites Friday & Monday Mania

Fat Tuesday, Slightly Indulgent Tuesday & Tasty Tuesday

Gluten-Free Wednesdays & This Chick Cooks

Banana Muffins and Mini-Cakes

Banana Mini-Cakes with Chocolate Chips

Hello, my name is Andrea and I am a sugar addict.

It has taken me several years of intense struggle to finally admit that I have a real problem with sugar.  I stopped eating all kinds of refined sugars about 4 years ago (along with gluten and soy) but I have intermittently experimented with agave nectar, maple syrup, honey and more recently coconut sugar.  You see, I love dessert and really felt like I couldn’t live without it…so I adapted every recipe I craved into a “healthier” version using natural sugar substitutes.

However, as I am living a “cleaner” primal lifestyle these days, no gluten, soy, refined sugar or grains I find that even the “natural” sugars sometimes bother me.  And when I say bother what I really mean is that they tend to make me a wee bit of a crazy person!!!!  It’s like a drug to me as it is for many people.  My saving grace is that my will power (I like to use that term way better than saying my obsessive-compulsive tendency) doesn’t allow me to over-indulge in the desserts I make, I only experience the mental torture…

Whew, now that I’m past the denial stage…I will admit that I still like to enjoy sweet treats on occasion which has led me to seek out desserts and baked goods that are fruit or stevia sweetened.  I visit the blog What I Crave regularly and to my delight found a recipe for Date Sweetened Banana Bread.  I made this recipe into muffins and a few heart-shaped mini-cakes (with mini chocolate chips added).  These muffins have the perfect texture and sweetness, they are wonderful with a pat of homemade butter or a schmear of cream cheese.  I like to have them for breakfast or as an afternoon snack with a nice cup of coffee or tea.

Muffins and Mini-Cakes

Date Sweetened Banana Muffins

Makes 18-24 muffins

3 ripe bananas

1/2 cup medjool dates, pitted (5 – 6 dates)

5 eggs

1/2 cup butter or coconut oil, melted

1 /2 cup coconut flour

1/4 cup ground flax seeds

1 teaspoon baking soda

1/4 teaspoon salt

1 teaspoon cinnamon

pinch of nutmeg

1/2 cup of pecans or walnuts, chopped

1/2 cup mini chocolate chips (optional)

  1. Preheat oven to 325 degrees F.  Line muffin tins with paper liners
  2. To a blender add two peeled bananas, pitted dates, eggs, and melted butter or coconut oil.  Puree until smooth.
  3. Sift all dry ingredients together in a separate bowl.
  4. Add wet ingredients to the dry and stir until there are no lumps.
  5. Chop the remaining banana and add to batter along with the nuts and chocolate chips (if using).
  6. Divide evenly between the muffin cups (I use an ice cream scoop which is about 1/4 cup of batter).
  7.  Bake for 22 to 25 minutes or until a toothpick comes out clean.
  8. Let cool completely on rack before serving.

Banana Muffins

Enjoy this wonderful recipe and check back often for more “sugar-free” treat recipes. 

 Remember…Life is too short to not have dessert!

This recipe is shared at:

Slightly Indulgent Tuesday,  Tasty Tuesday & Tempt My Tummy Tuesday

Gluten-Free Wednesdays

%d bloggers like this: